Is Bitlooker from Veeam a game-changer?

Disclaimer: This is not a performance comparison or test in any way, shape or form, it is merely my experience in a lab environment supposed to show an indicative relative difference in performance at a high level. OK, you get the picture?

So as you may know Veeam introduced a new feature in version 9 of Backup & Replication and I thought it would be fun to see if there were any actual benefits of using the feature called “Bitlooker” by doing some basic tests. The goal of my test was to see if there were any differences in running backup jobs with or without backing up dirty blocks (i.e blocks that contains data but has been marked as deleted and thus the blocks can be reused by the operating system) which is the actual functionality of Bitlooker. My starting position was that logically it makes sense of course that it would be more efficient in a lot of ways using Bitlooker but I wanted to see if it was quantifiable: difference in speed and/or backup file size – again at a high level. And as an extended test I also wanted to see if there was any notable difference between using Bitlooker and SDelete (a tool from Sysinternals that you run inside the guest OS to clean up dirty blocks by writing zeros to those blocks).

Description of the Test environment
A Veeam Backup & Replication environment was set up, using simple deployment (all services on a single VM). A virtual machine running Windows Server 2012 was set up as the VM to be backed up running on a vSphere 5.5 host. Anyone familiar with the VMCE lab environment, that’s basically what I was using with and extended drive on on one of the domain controllers. The domain controller was assigned a 200 GB thin disk. I filled the disk with 190 GB worth of data, deleted 160 GB of data and then went ahead with some comparison tests. To describe what actually happens inside the OS at this point, only pointers to blocks containing information is deleted not the actual data on the blocks themselves which means that the OS will know the actual consumption on disk but for an outside observer (vSphere and Veeam for instance) it makes no difference: a block containing data is a block containing data.

Since I’m running the tests on my brand new toy, a Gen 6 Intel NUC which is not an enterprise server, I’m not that interested in the actual performance figures but rather the relative difference between the different test scenarios – all else equal. Oh, but there’s just one thing: Bitlooker only works with Windows and NTFS filesystem.

I initially performed some tests on a 40 GB VM but felt that, even though I saw some great improvements, I couldn’t draw any actual conclusions based on them.

I quickly realized – “We’re gonna need a bigger boat!” and went for the 200 GB drive instead.

Since I already had performed some initial tests on my 40 GB environment the relevant scenarios at this point started at Test 8. All backup jobs were set up to take active full backup of the VM:

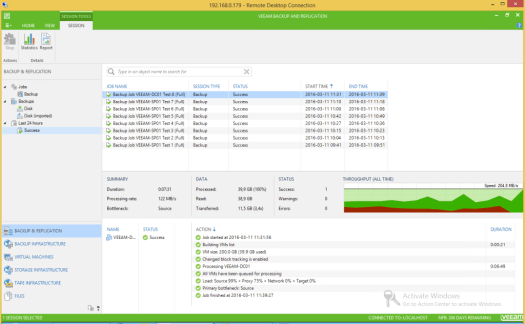
Test 8: A 200 GB vmdk where approx 40 GB was consumed. Basic backup test without Bitlooker enabled.

23 - Test 8 - Veeam GUI

24 - Test 8 - filesize

The resulting vbk-files from the 200 GB vmdk containing 40 GB of data is 12 GB in size.

Test 9: A lot of files were added to the VM, roughly 150 GB worth of data. Now the total consumed size of the disk is 191 GB. Again a basic backup test without Bitlooker enabled.

25 - Volume size pre-deletion of files

26 - VMDK size pre-deletion of files

A quick look shows the vmdk to be 200 GB in size.

27 - Test 9 - Veeam GUI

28 - Test 9 - filesize

With compression and deduplication the vbk-file ends up 95 GB in size.

Test 10: Now the fun begins, 163 GB of data was deleted and backup runs without Bitlooker.

29 - Size of files to be deleted

30 - VMDK size post deletion

Even though the files inside the OS has been deleted, the actual vmdk-file size doesn’t change and that’s expected behaviour from a thin disk. And it wouldn’t change even if you made a storage vMotion.

31 - Test 10 - Veeam GUI

32 - Test 10 - file size

This is  where it starts getting interesting, the vbk-file size is still the same size as we saw in the previous test: 95 GB! By logic it should be smaller since we’ve deleted 163 GB of data but clearly from the outside it doesn’t matter – a block is a block is a block.

Test 11: This is where we put Bitlooker to the test, same scenario as Test 10 but Bitlooker has been enabled on the backup job. That’s the only difference, a tick in a box.

33 - Test 11 - Veeam GUI

One big thing to highlight on the picture above is time spent backing up the virtual machine, 6 minutes compared almost 36 minutes in “Test 10”. That’s a huge difference, and the end result will still contain the exact same active data from the VM.

34 - Test 11 - filesize

Massive reduction, we’re now seeing vbk-sizes similar to the first initial backup test in “Test 8”.

Test 12: So let’s see if all types of “zeroing”-techniques are equal. We’re now using SDelete to do it’s job on the C-drive zeroing out all deleted blocks and the backup job runs without Bitlooker.

35 - C drive zapped with SDelete

36 - Test 12 - Veeam GUI

It performs faster than “Test 10” but slower than “Test 11”, that’s interesting! I wasn’t really expecting such a big difference I must admit.

37 - Test 12 - filesize

The backup file size is identical as “Test 10” though, and that was expected.

Test 13: So for fun let’s enable Bitlooker on the job, so SDelete and Bitlooker in conjunction.

38 - Test 13 - Veeam GUI

Bitsocker comes in to play again reducing the backup time to 6 minutes.

39 - Test 13 - filesize

No change in backup file size, that was expected. So there’s no benefit what so ever in this scenario of using SDelete.

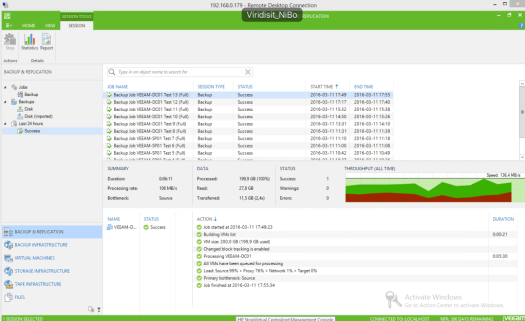
Test 14 – Extra test: Since there was such a difference between “Test 12” and “Test 13” let’s verify the behaviour by disabling Bitlooker and run the job again. This should mean more time spent on the backup, right?

40 - Test 12 verification - Veeam GUI

Yep, we’re back again pushing past 23 minutes for the job.

41 - Test 12 verification - filesize

Backup file size doesn’t change.

Conclusion
Reducing the amount of data to backup from your virtual machines has always been a good thing, how ever historically it has been a manual or at least semi-manual task to accomplish, running SDelete.exe or some eqvivalent tool for instance. Perhaps running as a scheduled task but nonetheless it had to run on the VM itself and would require time and valuable CPU and I/O resoruces in the process. It was also prone to human “error” since someone had to actual run the command or set up a schedule for it – meaning it might be forgotten or missed setting up new VMs. It’s worth mentioning that SDelete is a few years old and that there are other tools available you can use, one of which is a fling from VMware called GuestReclaim but I couldn’t use it in this case since it doesn’t work under Windows Server 2012.

Bitlooker changes the game completely, you literally only have to tick a box on a backupjob to make use of it! Faster backup times and smaller backup files, are there any drawbacks? Well yes and no, if you’re a windows shop go nuts with it but if you’re running any other OS you simply won’t be able to use Bitlooker.

Bitlooker is a great new feature from Veeam, not only does it reduce storage space required to hold your backup files but it also reduces backup time significantly for your active full backups (to be clear it will also make a difference on your incremental backups). As I already mentioned the tests were done on a tiny lab environment but it can still act as an eye-opener in terms of
relative difference with or without bitlooker enabled. Your own milage may vary, but you will see improvements. I tested 1 VM just for fun but I bet you have a lot more VMs, do you think you will save time? I’m sure of it!

“So what about cost? How much do I need to fork out for this great new feature you speak of?” I hear you say. That’s almost the best part: Nothing! You don’t need to pay anything! As long as you have a valid license and support contract you can just upgrade, it’s included in version 9 of Backup & Replication and for all editions: Standard, Enterprise and Enterprise Plus. For all new jobs created it’s even enabled by default and it can easily be enabled on your existing jobs – just tick the box. Thank you Veeam!

I would recommend enabling this feature on all your backups if you haven’t done so already. Period.

So ending with answering my question in the subject: Yes! It really is.

Mina topp 3 favoriter i Veeam Backup & Replication v9

För några veckor sedan släppte Veeam sin senaste inkarnation av Availability Suite, det vill säga Veeam Backup & Replication och Veeam ONE. Under ytan har en lång rad förbättringar gjorts. Bland annat har vi äntligen fått tillgång till en stand-alone console med resultatet att man numer kan vara flera administratörer inloggade mot Veeam servern, tidigare var vi begränsade till antalet RDS sessioner servern kunde hantera (och oftast var begränsningen 2 samtidiga administratörer för i ärlighetens namn: vem vill lägga på RDS CAL licenser på en backup server?).

En hel del nya funktioner och förbättringar ligger nära att komma in på min topp 3-lista men när inte riktigt hela vägen fram. För att bara nämna några exempel: On-Demand Sandbox for Storage Snapshots, Direct NFS Access, Explorer for Oracle, Active Full för Backup Copy jobs, Parallell hantering av VMs i Backup Copy jobs, VM Tags backup och restore.

Men för att återkomma till rubriken på denna post, vilka är då mina favoriter?

1. Per-VM backup files
Tidigare sparades samtliga VMs som ingick i ett backupjobb i en och samma backupfil, vbkfil, oavsett hur många VMs som valts. Problemet med detta är att resurserna inte används optimalt och backupen tar längre tid än vad som kanske är möjligt.

Per-vm single write stream
Med funktionen per-VM backup files påslagen så kommer istället fler skrivströmmar kunna hanteras om hårdvaran tillåter det. Om Backup Repositoryt kan hantera flera strömmar så bör man se kortare backuptider som resultat.
Per-vm multi write stream
Då man skriver till enskilda Backup repository vinner man möjligtvis en del i prestanda och tid men om man dessutom kombinerar per-VM backupfiler med Scale-Out Backup Repositories så kan man avsevärt öka hastigheten. Mer om Scale-Out Backup Repositories under punkt 2 i min lista.

Det är lätt att förledas tro att per-VM är en inställning man gör på själva backupjobben men de ändras de facto på våra Backup Repositories direkt. Rekommendationen är att slå på funktionen om man använder sig av deduplicating storage appliance som stödjer fler skrivströmma. Per-VM funktionen är som standard påslaget på Scale-Out Backup Repositories men går självklart att enabla även på vanliga Backup Repository.

Enable Per-vm backup files
För att per-VM backup ska fungera så måste man se till att man inte har ställt in någon begränsning i backupjobbet över hur många samtidiga uppgifter som kan hanteras (”Limit maximum concurrent tasks to:”) för att det ska fungera optimalt.

2. Scale-Out Backup Repository
När disken du sparar dina backupfiler på, ditt Backup Repository, börjar ta slut blir det en hel del manuellt arbete för att lägga till mer disk, skapa nya repositories, kanske flytta backup-filerna, ändra target i backupjobben osv. En hel del arbete alltså. Det är här Scale-Out Backup Repository (SOBR hädanefter) kommer in. När man skapar ett SOBR så agerar det som en virtuell mottagare av backupjobb, i ett SOBR så har man flera ”normala” Backup Repositories tillagda – ju fler desto bättre. Man kan blanda olika typer av Backup Repositories i samma SOBR: Windows Backup Repositories, Linux Backup Repositories, Shared folders, Deduplicating storage appliance. Undantaget är Cloud repositories. När ett Backup Repository lagts till i ett SOBR kallas det därefter ett extent. Samtliga extents i ett SOBR bör finnas inom samma site.

När man flyttar in ett Backup Repository, som används av befintliga backupjobb, i ett SOBR så ändras automatiskt backupjobbens target. Man behöver alltså inte gå in i varje backupjobb och ändra target, ganska smidigt! När man väl lagt till ett Backup Repository i ett SOBR så kan man inte längre använda det som ett stand-alone repository.

Det finns några typer av jobb som inte kan använda ett SOBR: Configuration backup job, Replication job, VM copy jobs, Endpoint backup jobs.

Edit Scale-Out Repository
Varje Backup Repository man lägger till kan taggas med vilken typ av backupfiler den ska hantera: Fulla backupfiler, inkrementella filer eller båda.

Extent settings
Syftet med detta är att öka upp prestandan där man kan sprida ut lasten över flera olika diskmiljöer. Dessutom finns 2 olika policys man kan ange på ett SOBR. ”Data locality” innebär att alla filer som tillhör en specifik backupkedja (både full- och inkrementella backupfiler) samlas på samma extent. ”Performance” separerar fulla- och inkrementella backupfiler på olika extents.

SOBR Policy
Ett exempel: Man använder policyn “Performance” och har 2 extents, med 100 GB respektive 200 GB ledigt utrymme, i sitt SOBR. Båda extenten kan hantera både fulla och inkrementella filer. När ett backupjobb kör så kommer Veeam Backup & Replication att välja ut vilket extent som ska användas på följande sätt:

  1. Vid första körningen kontrolleras vilka extents det finns tillräckligt mycket ledigt utrymme på. Kan båda extenten husera den fulla backupfilen så väljs det extent med mest ledigt utrymme: 200 GBs extentet alltså.
  2. När sedan nästa backup startar, ett inkrementellt jobb, så kontrolleras var den inkrementella filen kan placeras. Om båda extenten kan hantera inkrementella filer så väljs den extent som INTE hanterar den fulla backupfilen – den med 100 GB ledigt alltså.

I början av varje backupjobb gör Veeam Backup & Replication en grov estimering av det lediga utrymmet som behövs för att lagra backupfilen:

  • Storleken på en full backupfil är lika med 50% av den ursprungliga VM:n
  • Storleken på av inkrementell backupfil är lika med 10% av den ursprungliga VM:n

Med många extents i ett SOBR finns alltid risken att ett extent försvinner av någon anledning (trasig disk exempelvis), men man har möjlighet att ange en policy som tvingar en ny full backup om någon extent som innehåller filer i backupkedjan saknas – ”Perform full backup when required extent is offline”.

2. Perform full backup

Eftersom ett SOBR kan, och bör, innehålla flera extents så kan det finnas tillfälle då enskilda extents behöver ändras eller hanteras på något sätt. Den underliggande disken kan vara trasig eller man vill kanske sluta använda ett specifikt extent. Då finns det några service funktioner att tillgå:

  • Maintenance Mode – När ett extent är i maintenance mode har den begränsad funktionalitet:
    • Veeam Backup & Replication startar inte nya jobb där extentet används.
    • Du kan inte återställa VM data från backupfiler som ligger på det extentet. Du kan inte heller återställa VM data från backupfiler på andra extents om delar av backupkedjan ligger på extentet i maintenance mode.

Om det finns pågående jobb mot extentet sätts det i maintenance mode först när jobbet är klart.

Kan användas exempelvis vid trasig disk eller om man behöver uppgradera servern som hanterar Backup Repositoryt/extentet

  • Backup Files Evacuation – Om man vill ta bort ett extent från ett SOBR måste man först evakuera (flytta) backupfilerna från extentet. Då man evakuerar ett extent så flyttar Veeam Backup & Replication backupfilerna till ett annat extent inom samma SOBR. Backupkedjan bibehålles och man kan använda dem som vanligt. Om inte extentet är satt i maintenance mode före man evakuerar filerna så avbryts jobbet.

Veeams marknadsavdelning har fått bestämma och det officiella namnet är därför ”Unlimited Scale-Out Backup Repository”. Som instruktör för Veeams VMCE kurser så vet jag att detta kommer att ifrågasättas, så jag ställde frågan till Veeam ”Vad är den tekniska begränsningen för hur många extents man kan ha i ett SOBR?”. Svaret jag fick får mig att tro att inte många kunder någonsin kommer ens i närheten av att nå taket:

”Every Scale-Out Backup Repository extent has a UUID. We use a 128 bit UUID, which means we are “limited” to 2^128 extents. That is a lot of extents!”

Funktionen Scale-Out Backup Repository är inte tillgängligt alla licenser utan finns i Enterprise och Enterprise plus licenserna.

Enteprise licensen är begränsad till 1 SOBR med max 3 stycken extents. Det finns inga begränsningar i Enterprise plus licensen.

3. Bitlooker
Nästa funktion som är riktigt bra är bitlooker. Tänk dig att du har en VM som har en 100 GB disk, du kopierar in massor med filer och fyller disken. Därefter tar du bort 50 GB av filerna. I operativsystemet har du nu 50 GB ledigt utrymme, däremot så innehåller blocken på disk fortfarande information även om de är ”raderade”, så kallade dirty bits.

När Veeam Backup & Replication i tidigare versioner har tagit backup av den virtuella maskinen så har man inte vetat om det är ”vanliga” bits eller dirty bits vilket inneburit att alla block som innehåller information har sparats vilket resulterar i att 100 GB backas istället för 50 GB. I version 9 har man nu gjort det möjligt att kryssa i en ruta (Exclude deleted file blocks) under advanced-fliken på backupjobbet.

3. Exclude deleted files
Exclude deleted file blocks är ingen universallösning för samtliga operativsystem i hela världen, funktionen är specifikt för Windows operativsystem och NTFS filsystem.

Det är Backup Proxy som tar hand om att identifiera och sortera bort dirty blocks när data skickas över till Backup Repositoryt.

3. Bitlooker zeroing ou
Men det slutar inte där, vi kan numer minska ytterligare på vad som backas upp – genom exkludering av filer och/eller kataloger. Kravet för att aktivera denna funktion är dels att den virtuella maskinen använder Windows NTFS filsystem och att Application-Aware processing är enablat på jobbet. Därefter specificerar man vilka enskilda filer, filtyper eller kataloger som ska undantas från backup. Man kan även använda sig av ”Environment Variables” exempelvis %TEMP%.

3. Exclude folder
Man kan lägga till flera olika exkluderingar exempelvis:
C:\report.*;*.pst;%TEMP%

Att lägga till exluderingar kan påverka backuptiden, mer arbete för proxyn innebär förmodligen att det ta längre tid med backupen.

Detta är min topplista, vilka är dina favoriter?