A new series: How and why – Starting with VMware vSAN

I’ve been thinking about creating and sharing short (no more than say 30 minutes) videos of how certain functions or features works and how to set it up. I’m going to create a series of video content that might be useful over the next few week. I’ve decided to name the series “how and why” since this is the angle I’m taking – how do you setup the feature and whats the benefit of actually using the feature.

So the inaugural video will be based on VMware vSAN. Feel free to drop me tweet on future videos you’d like to see.

The video is in swedish only at the moment.

(Re)claim your space!

In one of my previous posts, Is Bitlooker from Veeam a game-changer?, I wrote about the benefits of using Bitlooker for backup jobs when using Veeam Backup & Replication v9.x however Bitlooker is a feature that is not only available for backup jobs – you can use it for replication jobs as well.

So I thought it’d be fun to see what difference, if any, it makes. The goal of my tests is to figure out the most effective way of copying/replicating a VM from one host to another.

The set up for the test:

A virtual machine is installed with Windows Server 2016 standard edition. 100 GB disk assigned to the VM, thin provisioned. The disk is then filled with files (a bunch of iso-files of different sizes). That’s the baseline, then roughly 85 GB will be deleted (all the added iso-files) – then trashcan will be emptied. So we’ll have some blocks containing stale/old data, the blocks are marked as available to be reused from the operating system point of view but they haven’t been zeroed out so from any hypervisor (outside the VM) it just looks as any other block containing data.

Operating system installed (Windows Server 2016) and updated. The VM now consumes 13,5 GB worth of storage.

Then a bunch of files were added (almost) filling the entire disk.

From the vSphere side of it:

At this point the just added files were removed and trashcan emptied.

And from vSphere:

Now the command ‘ls’ will not show the actual size, so ‘du’ can be used instead to see the actual size of the vmdk file:

I’m going to test 4 different scenarios:

  1.  Migrate the VM from one host to another offline (VM will be shutdown).
  2. Replicating the virtual machine with VMware vSphere Replication 6.5.
  3. Replicating the virtual machine with Veeam Backup & Replication without Bitlooker enabled.
  4. Replicating the virtual machine with Veeam Bitlooker enabled.

The thesis, or point to prove, is that test 1-3 will have no or little impact on the size of the vmdk file however – magic will happen on test 4. So lets perform the tests and find out for real!

Test 1:

VM moved to another host while offline and now let’s explore what can be seen using different methods.

Inside the VM:

From the host:

So no change in vmdk file size as expected.

Test 2:

The virtual machine will be replicated to another host using VMware vSphere Replication 6.5.

VMware vSphere has been configured using the following settings:

Not alot of settings, in fact, the above settings will have no impact on the vmdk size. They will only have control how the snapshot on the VM will be generated (crash consistent vs consistent backup) and the impact the replication job will have on the network.

Inside the VM:

From the host:

Since ‘ls’ doesn’t show the actual size on a thin disk, disk usage ‘du’ is used instead:

So no change in vmdk file size as expected.

Test 3:

The virtual machine is replicated to another host using Veeam Backup & Replication v9.5.

Replication from a Veeam perspective has been set up, to make a fair comparison to the VMware replication test (test 2), the Veeam job will not use exclude swap file blocks:

Processed and read data in the picture below tells us that Veeam doesn’t know the difference between blocks in use and blocks marked as deleted (the same applies for almost all backup vendors):

Inside the VM:

From the host:

And using ‘du’:

So no change in vmdk file size as expected.


Test 4:

Know time for the fun stuff. The virtual machine will be replicated to another host using Veeam Backup & Replication v9.5. We will use both space saving techniques we can enable on the job (with application-aware processing we can also exclude specific files, folders, file extensions but we’re not using that feature in this test)

Now, this is the magic we were looking for! The  proxy server has processed all of the data but it has only read data that contain used blocks!

From the VM:

From the host:

Now the vSphere web client combine the .vmdk and -flat.vmdk file into one (like it’s done forever):

And the disk usage utility shows:

Yikes! That’s cool stuff!

Conclusion:

Bitlooker is a feature you should have enabled on any relevant job. It certainly can be used to reclaim that precious storage space you so desperately need.  Heck, why no use it as part of your normal failover testing, cause you’ll already doing that right? Once a month (or how often you feel appropriate) do a planned failover using Veeam Backup & Replication, verify that you DR plan works and as an added bonus you reclaim disk space in the process!

And yet another benefit is the spent replicating the virtual machine, without Bitlooker it took 30 minutes to replicate the VM from one host to another but it was just shy of 7 minutes with Bitlooker enabled.

So seriously, why are you not using this magic thing? There’s only one drawback, Bitlooker supports only NTFS file system (=Windows VMs).

The unsung heroes of DRS in vSphere 6.5

VMware vSphere 6.5 has been out for a while now. Some features didn’t get as much publicity as it should, at least in my mind. A few of the really cool features that were introduced in vSphere 6.5 related to DRS, opening up for additional configuration and control of your cluster and virtual machines. It’s found under DRS settings and is called ”Additional Options” where you’ll see 3 new settings:

  • VM distribution

Under normal circumstances DRS will load balance VMs so each virtual machine has the resources it requires, taking into account the cost of vMotioning workloads around to new hosts (as a side note, CPU and RAM has been used since inception of DRS but now it’s also network aware) as one decision-making parameter. This will result in a cluster where you normally won’t see an exact split/distribution/load balancing of the virtual machines cross the hosts, some hosts may be running more VMs than the others. That’s not a problem since the VMs have the resources they need, they are not starved for resources, but the user perception of the DRS functionality is that VMs will be split equally across all hosts. One concern that might require some rethinking of that approach is availability, what if the host running the majority of VMs crash? HA will certainly restart the VMs but a lot of services will be impacted in the environment – Enter VM distribution!

The purpose of VM distribution is to have a fair distribution of VMs on your hosts. Or as it says on one of the official VMware blogs: ”This will cause DRS to spread the count of the VMs evenly across the hosts.”

However, DRS will always prioritize load balancing over the VM spread, so even distribution of VMs is done on a best-effort basis.


  • Memory Metric for Load Balancing

DRS will mainly consider active memory when load balancing, as opposed to consumed or granted memory to VMs. DRS will also take some overhead memory into consideration, so it will use active memory + a 25 % overhead as its primary metric. Active memory is a ”mathematical model that was created in which the hypervisor statistically estimates what Active memory is for a virtual machine by use of a random sampling and some very smart math.  Due diligence was done at the time this was designed to prove the estimation model did represent real life.  So, while it is an estimate, we should not be concerned about its accuracy.”

A really good read on the subject, and where the quote above came from, is “Understanding vSphere Active Memory”.

Now it’s possible to change what memory metric that is used when load balancing, instead of active memory we can use consumed memory. And by the way, the definition of consumed memory: ”Amount of guest physical memory consumed by the virtual machine for guest memory. Consumed memory does not include overhead memory. It includes shared memory and memory that might be reserved, but not actually used.

Virtual machine consumed memory = memory granted – memory saved due to memory sharing” – Quote from “Memory Performance Counters – An Evolved Look at Memory Management”.

This option is equivalent to setting the existing cluster advanced option PercentIdleMBInMemDemand with a value of 100.


  • CPU Over-Commitment

It’s now possible to enforce a specific level of overcommit of vCPU to pCPU resources in the cluster, if you only want to allow 4 virtual CPUs per physical core in your cluster you can now have it configured and enforced by the cluster. When the cluster runs out of pCPU resources you won’t be able to power on any more virtual machines. You define a percentage of over commitment of the entire cluster, setting it from 0 % (= no over commitment allowed or put in another way: 1 vCPU = 1 pCPU) up to 500 %.

vSphere Data Protection

VMware has for a pretty long time integrated (at least license wise) a backup engine with vSphere. It’s available as a stand alone OVA download but once deployed it integrates with the vSphere web client. The current release, version 6.1.3, was brought online on the 15:th of November 2016.

The new release of VMware Data Protection, VDP for short, supports VMware ESXi 5.1 or later, vSAN 5.5 or later.

Since it’s been a while since I last had my hands on VDP,  I thought it be a good idea to see how the product has evolved. How to install, configure, backup and so on.

Full disclosure: Amongst others, I’m a Veeam Certified Trainer but I’ll try my best not to be too biased.

Installation is straight forward, get the VDP OVA from VMware bundled with vSphere and deploy the appliance to a host in your environment. I had some issues with my small home lab, DNS needs to be set up and configured correctly with both forward and reverse lookups. Since I don’t have DNS in my lab I was not able to get passed the initial configuration wizard in the VDP, merely altering the hosts file was not enough. But as usual, whenever I need to google a problem I always wind up on William Lam’s webpage – Thanks William! (note to self: Set the web browser start page to virtuallyghetto.com and save valuable time).

VMware has some best practices when deploying VDP:

    • For a better performance of vSphere Data Protection in a high-scaled environment, where Data Domain is the destination or the target, use the following reference to deploy the number of virtual machines according to the capacity of vSphere Data Protection appliance:
vSphere Data Protection Appliance Capacity Number of Virtual Machines to Deploy
0.5 TB 20
1 TB 30
2 TB 40
4 TB 80
8 TB 100
  • For effective load balancing, deploy a maximum of 10 vSphere Data Protection appliances with 100 virtual machines per vSphere Data Protection appliance, in a single vCenter Server domain.
  • In a large environment, deploy a maximum of 8 proxies per vSphere Data Protection appliance regardless the size of the vSphere Data Protection appliances.
  • For better performance of backups and restores, limit the size of each virtual machine to a maximum of 2 TB.

Installing and configuring the VDP:

Once deployed and configured management of jobs are done using the vSphere web client, first thing to do is to connect to the VDP from the web client:

When connected you have a few options, creating a new backup job, verifying a backup job or restoring a backup. You can also download “Application Backup clients” which can be useful when managing VMs running SQL, Exchange or Sharepoint. The purpose of the agents are to get application consistent backup of VM and have the logs being truncated afterwards.

When you click on the Application Backup clients you end up on the configuration page of the VDP, at the bottom there are links to the individual clients. And on this page you can configure email settings or check log files as well if needed.

Creating a backup job is pretty easy, go through the wizard a change settings, select either “Guest images” or “Applications”. If you select Applications you can select what application and specific database you need to back up.

Select what to backup, entire VM or individual disks.

Now you select which VMs to backup, either select individual VMs or a parent container such as a resource pool or a host (or indeed the entire vCenter server). This is where I find myself questioning VMware’s approach a bit. Why can’t you use folders or tags? Grouping VMs in resource pools just for the sake of backup is a bad thing, resource pools are for dividing up resources and should never be used as a “backup grouping mechanism”. No Tags, folders and so on? Really VMware? Eat your own dog food.

Next you set up the schedule for the backup, you can only set up one backup/restore point per day at most. So you can’t really have advanced scheduling, is backing up a VM once a day good enough? If so then it’s not a problem.

Next, select how long you’d like to keep the restore point. You can either select a simple set up where you set how many days you store the backup or to a specific date but you also have the option of creating a GFS set up. A Grandfather, Father, Son backup is used if you’d like to save weekly, monthly or yearly backups. Nice!

Give the backup job a meaningful name.

Verify that everything is ok.

There you have it, quick and easy to set up. The GUI shows all your available backup jobs on the specific VDP.

Once the backup has been performed you might want to verify that the backup is actually useful, that it can be restored if need be.

Create a new backup verification job.

Select the virtual machines you want to verify.

A heartbeat test will be performed, i.e. the virtual machine will be powered on and VMware will verify that it has a heartbeat to the host (meaning that the operating system of the virtual machine actually started and that the VMware tools service started as well, which will indicated that we have a running OS). But if you provide a script of your own, and have it placed inside the VM you can basically test anything you want. You can perform a much more comprehensive and advanced test for your VMs with a script.

Select a host where you’d like to restore and power on the VM, make sure it has enough resources to actually perform the verification test.

Select the datastore to be used when restoring the VM. Again, the host has to have enough CPU and RAM available to power on the VM but more importantly it has to have enough diskspace as well. Since we have to restore the entire VM the host would need to have free disk space on a datastore. Might not be a problem if we’re verifying a small VM but what about your fileserver or that huge mail server? Do you have X TB available to actually be able to perform the test?

Set a schedule for the verification job, once a week perhaps?

And we give the job a meaningful name.

Verify that everything is ok.

Now we have a summary of all verification jobs available on this VDP server.

It’s possible to either schedule a verification job or to run it manually.

Files of the virtual machine will be restored to the designated datastore and to a folder named VDP_VERIFICATION_<vm-name> -<unique number>.

And there you have it, a successful backup verification performed. Now I have the confidence to restore this particular VM if it would break down for any reason.


Replication:

If you are serious about your backup data you would probably want to design the backup environment in a way that it is protected from a complete site failure. That’s not a problem in VDP, there’s a built in function to replicate your backup information making it easy to have a secondary copy of your data on a remote site.

Backups created with VDP 6.0 or later can be replicated to another VDP appliance, to an EMC Avamar server, or to a Data Domain system.

Emergency!

If you need to restore virtual machines, vCenter and VDP needs to be available however there is a way to restore directly to a host if needed. If for instance you need to restore vCenter itself. The processes is called “Emergency restore” and entails disassociating the VDP from vCenter prior to restoring.

File level restore:

File level restore is possible using the “VDP Restore Client”, no need for an image based backup and a separate file level backup. The VDP Restore Client is accessed using a web browser from the VM to which you want to restore a file. So it has to be running, no redirected restores unless you’re using “Advanced login” then it’s possible to mount any backup file and restore it to the current VM you are running the VDP Restore Client on. And since you have to connect using a web browser to the VDP server from the VM, you’re required to have network connection (and any potential firewall ports opened up for traffic). VMware VIX anyone?

The Good:

  • It’s available on almost all vSphere editions (only missing in the smallest, vSphere Essentials kit).
  • Easy to set up, easy to configure.
  • Verify the backup, always a good thing.
  • You can create GFS retention policies.
  • Since you can replicate backups/VMs to a secondary VDP appliance you can protect your workload from a complete site failure, nice!
  • Makes use of CBT to minimizes the impact of the backup.
  • It has some  basic backup functionality which would go a long way for some environments.

The Bad:

  • The VDP appliance version 6.1 does not support backups and restores of virtual machines on Virtual Volumes (VVOLs).
  • An emergency restore operation restores a VM directly to the host that is running the VDP appliance. And the host running VDP can’t be part of the vCenter inventory, if it does – the host also has to be disassociated with vCenter prior to the emergency restore.
  • The Restore Client service is only available to virtual machines that have backups that are managed by VDP. This requires you to be logged in, either through the vCenter console or some other remote connection, to one of the virtual machines backed up by VDP.
  • If you need advanced scheduling of backups, multiple backups a day of a VM.

Summary:

If I try to summarize, VDP has it’s merits. It’s not the full blown availability solution that for instance Veeam represents but then again VDP is free of charge for all licenses of vSphere (it’s available for vSphere Essentials + and upwards) and is not intended to be used for larger organizations I imagine. It’s very easy to set up and if you don’t have any advanced requirements on your backup it should fill your needs. You do need to be aware of and plan for things like resource consumption for backup verification and how to handle file level restores. And it’s a bit disappointing to find a blog post from 2013 talking about tags and folders as “containers” when creating backup jobs, but nothing has happened yet. It would make a huge difference in terms of management of your jobs.

So, for some organizations, it will be just what the doctor ordered but for others it may be….well, to basic.

My top 5 features of VMware vSphere 6.5

5. VMware vCenter High Availability

Since many functions are relying on vCenter being present and available, making the vCenter Server itself highly available is crucial for large scale deployments. In the past there’s been a few solutions that tried to handle this but now it’s already built in when you fire up your server. If you’re using the vCenter Server Appliance you have the ability to configure it to run in a high availability fashion using “vCenter High Availability”. Now, I need to emphasize, this is exclusively for the vCenter Server Appliance and not for the windows version of vCenter. You get an active node, a passive node and a witness node that makes the vCenter Server availabile by a click of a button. Simple.

4. vSphere Update Manager

Not really a new thing but since vCenter 6.5, vSphere Update Manager is now available for the vCenter Server Appliance as well – making a separate server unnecessary. Finally!

3. VMware PowerCLI

I’m a huge fan of automating and quite frankly PowerCli has to be on the list based on that fact alone, but there are some significant improvements to the different modules. A big leap forward in terms of automation.

2. Virtual Machine Encryption

For the security conscious people out there, this should be a huge deal. The ability to encrypt virtual machines from the outside means it’s independent of the OS inside and also that it’s storage agnostic.

1. Enhancements for Nested ESXi

I do a lot of demos and testing in lab environments I really appreciate the improvements made for nested environments. There has been a fling available for some time that basically reduced the traffic and load on the individual hosts through a MAC learning algorithm. It has now been integrated in the full release of vSphere 6.5. This results in significant performance improvement in nested ESXi environments with vSphere 6.5.

And a honorable mention goes to vSAN 6.5 with improvements such as iSCSI support for physical workloads, 2 node direct connect for the small deployments and of course PowerCLI cmdlets support for vSAN.

VMware vSAN iSCSI use case?

In a previous post I went through a list of my personal favorite features in vSphere 6.5. VMware vSAN is on of them, it’s a storage solution that handles your virtual machines – amongst others as we shall see today.

One of the nicest features introduced for vSAN in vSphere 6.5 is the ability to attach physical servers to the vSAN cluster. By letting the vSAN handle the iSCSI volume, since it’s just another object in the vSAN, you can apply the same policies on that volume as you do on the vSAN datastore used for you virtual machines. And that means you’re able to manage the performance and/or availability, not just when initially setting up the volume but any time the requirements change for the volume you’re able to adapt.

So is it hard setting up vSAN with iSCSI targets and attaching physical servers to it? Not at all, it’s quite easy actually. Let me show you how easy it is. But first we have to create a vSphere cluster with vSAN enabled and configured. Now, I’m a big fan of PowerCLI and automating a lab environment set-up is thanks to William Lam a breeze. I’ve adjusted his script slightly to allow me to select 3 different sizes of the ESXi hosts to choose from: small, medium or large. This allows me within 30 minutes to have a lab consisting of 3 ESXi hosts and a vCenter appliance up and running, configured with a cluster and vSAN enabled. The medium and large size configurations would normally be used for VMware NSX labs and demos.

It might not be the intended use case, but wouldn’t it be fun to host virtual machines from a Hyper-v environment on a vSAN? “Why?” I hear you say, no reason, just because we can!

PowerCLI

So first thing is to execute the PowerCLI script to bring my lab environment online:

Logging on to vCenter will now show the three hosts in a cluster with a new datastore created, a vSAN datastore.

Next, we need to enable the iSCSI functionality, which is a simple process:

Enabling the Virtual SAN iSCSI target service requires some input, specifically

  • Default iSCSI network to use – in a production environment you’d probably want to set up a dedicated VMkernel iSCSI interface for this.
  • Default TCP port – usually no need to change this
  • Default authentication – If you’d like you can set up the connection to use either None, CHAP or Mutual CHAP
  • Storage Policy for the home object – Using the predefined storage policies you can have the home object that stores metadata for the iSCSI target protected for host failures

If you want, you can create a new policy with specific settings for iSCSI Targets and Home object:

The default vSAN storage policy is used.

It protects you against one host failure, to do that it will have the object placed on two different hosts. This means it will use twice the space assigned to an object/VMDK file from the vSAN datastore.

Next up, creating a target and LUN:

You create both the Target IQN (with the desired settings and policies) and a LUN. Depending on the LUN Storage Policy you are using you will consume space from the vSAN datastore accordingly:

Now the set-up of the Target and the LUN is done. It’s that simple! After this point you can attach any physical server using iSCSI to the vSAN datastore and use the resources. In my lab though, I’m going to use a virtual machine from another host to emulate a physical machine.

You probably don’t want just any old server being able to attach to the LUN, so you can configure which initiators are allowed to connect. Either use individual IQNs or create a group of IQNs.

Let’s take a look what has happened on the vSAN Datastore:

We can now clearly see that there’s a new VMDK file that we can handle just as any other VMDK file, inflate it, move it or delete it:

Next up: Creating a Windows Server 2016 VM (emulating a physical machine) that will connect and use the new vSAN LUN we created. 

Setting up the VM is pretty straight forward.

Select the desired OS:

Here’s where we need to make changes, first assign at least two CPUs to the VM and secondly tick the box for hardware virtualization (otherwise the role Hyper-V won’t be able to start or be installed).

The summary page shows us what settings we’ve selected for the VM

We run through the installation of the operating system. Configure everything we need, a static IP address, updating windows and so on:

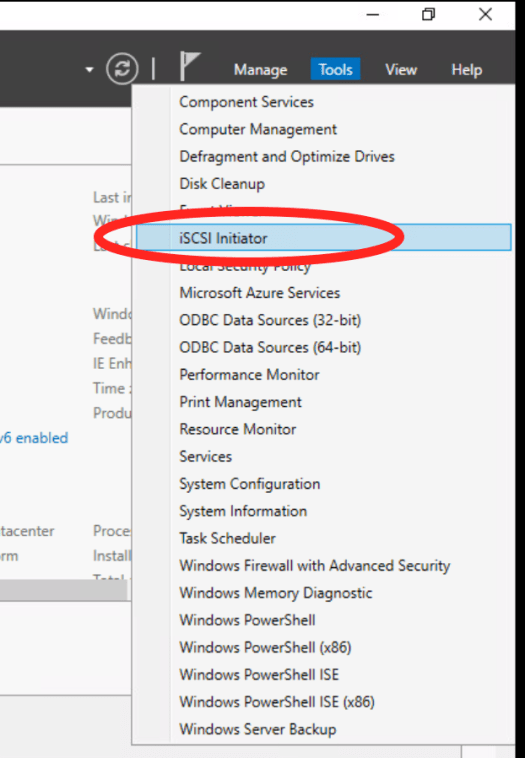
OK, Windows Server 2016 is ready to be used, let’s configure the iSCSI connection:

Yes, we’d like to start the iSCSI service:

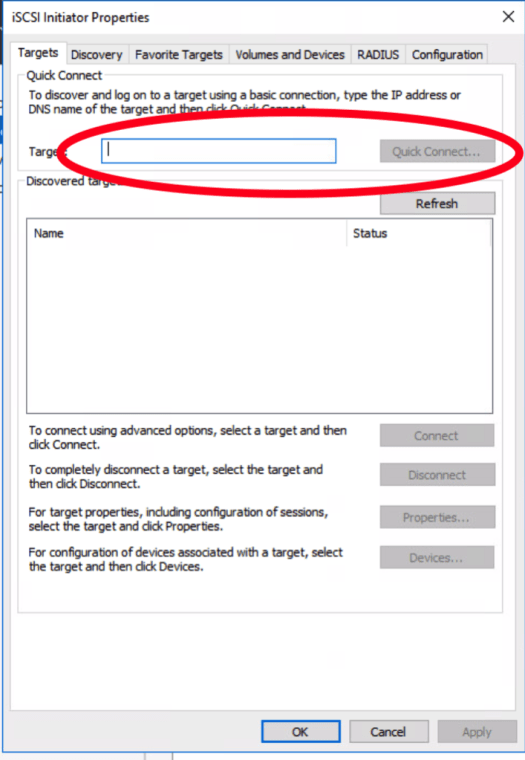
Again, in a production environment you’d probably want to have som fancy stuff set up such as MPIO and so on but for this test we’ll just do a quick connect to the iSCSI target:

Oh, but what IP address should I use? The host that is responsible for the I/O to the LUN can be found on the configuration page of the iSCSI Target:

We connect Windows to the I/O Owner host:

We have a connection, all is well:

Open up the disk management tool and a new disk should be available (if not, try a rescan). Bring the disk online, initialize it and format it:

Give the volume a name:

Now the volume is ready to be used:

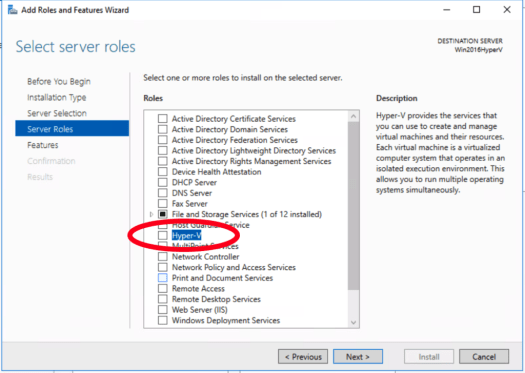
Hyper-v will now be installed on the Windows Server 2016 machine:

Add the required features and tools

Configure a virtual switch for Hyper-V

Now we can actually leverage the newly created vSAN volume and use that as the target for our Hyper-V virtual machines:

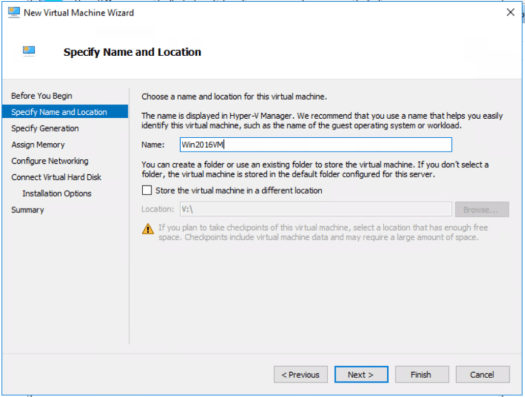
A simple test to confirm that it actually works, creating a virtual machine for Hyper-V running off of the vSAN volume:

Go through the wizard, give the VM a name and so on.

Choose what generation the VM should be created as:

Select a network connection if needed

Set the size of the virtual hard disk.

Select an iso-file to be used when installing the OS in the Hyper-V virtual machine

Done, just hit finish

The VM is created, start it and connect to it to get the console view

Install the operating system and update it, configure it the way you want it

Now we’re running a virtual machine in Hyper-V with it’s disk being handled by VMware vSAN! Pretty cool.

Now we can go back to see what impact, if any, installing the operating system had on consumed space on the vSAN volume:

As you can see, the VMDK file containing the Hyper-V volume has grown that’s just as we expected.

There you have it! It’s very, very easy to set up vSAN to use iSCSI – why not give it a try yourself?

VMworld 2015 – dag 2

Sitter och funderar på gårdagen, många intryck med det som står ut mest är faktiskt en liten men revolutionerande tech preview – vMotion från eget till vCloud Air (VMwares molnlösning). Kan bara summanfattas som: wow, fantastiskt!

Men, det går inte att hålla sig kvar i gårdagen. Idag är en ny dag men fler nyheter att presentera. Bland annat presenterade Saanjay Poonen deras stora End User Computing (EUC) lansering för dagen. Deliver any app to any device, riktigt imponerande. IDC har i sin undersökning för 2015 om Virtual Client Computing Software market placerat VMware i ledareposition framför andra spelare som Citrix och Microsoft. Men det verkar som en både Microsoft och VMware har förstått att kunderna vill ha samarbete företagen emellan, Jim Alkove Corporate Vice President for Enterprise and Security på Microsoft stod på scen idag. VMwares scen. Smaka på det en stund. En bra och tydlig signal.

Windows 10 kan enkelt manageras via VMware Airwatch tillsammans med App Volumes. Både virtuellt och fysiskt.

Ett genomgående tema på dagens presentation är att en grundläggande plattform  är NSX, VMwares nätverksvirtualisering. Det är tack vara att detta hanteras via mjukvara som man kan få säkerhet och konfiguration att fungera. En grundpelare helt enkelt. I går annonserades den senaste versionen av NSX 6.2.

En kommentar som sades i en av kundfilmerna var riktigt passande angående konkurrens mellan företag: It’s no longer the big beating the small, it’s the fast beating the slow.

Pat Gelsinger höll hov i dagens keynote, han talade mycket om hur omvärlden förändras och hur  vi under de kommande 10 åren kommer påverkas. En mycket bra presentations som verkligen gav intryck.

VMworld 2015 – dag 1

Hektisk dag med mycket på agendan men massor av matnyttig information. Redan första sessionen visade sig vara väldigt intressant – Connecting the dots from vCenter Server to vCloud Air. Unified Hybrid Cloud är dagens nya slagord. Idag lanseras vCloud Air Hybrid Cloud Manager som en gratis produkt för managering och integrering av vCloud och vCenter Server, installationen görs i vCenter Web Client.

Årets tema för VMword är “Ready for any”, det syftar bland annat på att alla applikationer oavsett typ, cloud-native eller legacy enterprise, så är VMwares plattform det bästa valet. One cloud, Any Device, Any application.

VMwares vision är att vi ska ha ett moln, inte i betydelsen ett enda faktisk moln utan ett eller flera moln som sömlöst fungerar mellan on-premise, off-premise (publika moln), managerat moln.

Termen molnlösning har historisk varit förknippat med datacenter och server, nu vill VMware ändra på begreppet och skifta fokus mot applikationer. Framtiden för applikationer är inte längre molnbaserade eller on-premise, framtiden är Hybrid applications enligt VMware. Känslig information i ditt eget datacenter och de skalbara delarna i molnet med alla fördela som finns där.

En av de funktioner som fångade mitt intresse och gjort VMware till den enterprise spelare som man är idag var vMotion, möjligheten att flytta en virtuell maskin från en host till en annan utan avbrott. Fortfarande magiskt att se det i praktiken mer än 10 år senare. Idag visade man en tech preview på vMotion mellan private cloud och vCloud Air! Nästan vansinnigt, flytta dina interna virtuella maskiner till ett publikt moln utan nertid!!

Några av de nyheter som presenterades idag:

  • EVO SDDC manager – förlängningen av EVO:Rail
  • vCloud Air Hybrid Cloud Manager
  • vSphere Integrated containers
  • Photon platform
  • vMotion cross-cloud (on-premise till vCloud Air) – tech preview

VMworld 2015 – Partnerdag

Eller jag tror det är partnerdag idag, söndag den 30:e augusti. Jag kan nämligen inte vara säker. Jag är taggad som bloggare, det är ju i och för sig trevligt eftersom man bland annat får tillgång till ganska bra placering vid keynote sessionerna och access till medias lite mindre belastade nätverk. Men detta har också lett till att jag inte kommer in på partnersessionerna – jag jobbar ju för en VMware partner (TDC Sverige AB för de som inte känner till mig).

Conflict of interest tydligen, det kan man kanske tycka. Jag är väl inte direkt bered att skriva under på det än med tanke på min historik men så blev det nu tyvärr. Vad ska man då göra med en hel dag som öppnat upp sig? Inga problem kan jag lova, det finns nämligen som vanligt Hands-on labs man kan göra. Massor av nya saker att lära sig. Underbart!

Förresten, jag kommer att försöka lägga in lite inlägg här för att sammanfatta mina intryck men jag finns även på twitter: @nicke_borgstrom

Fortsättning följer!

VMwarecertifiering på gång? Recertify for Less

VMware införde tidigare i år ett krav på dig som VMware Certified Professional, VCP-certifieringen är giltig i 2 år och därefter måste man certifiera sig igen. Syftet med detta kravet är att få individer att antingen gå ”upp” i certifieringsstrukturen eller bredda sig. Man har alltså två möjligheter:

  1. Certifiera sig inom ett nytt område, exempelvis End User Computing eller vCloud om man sedan tidigare är certifierad inom Datacenter Virtualization.
  2. Ta en, eller båda, VMware Certified Advanced Professional (VCAP) certifieringarna. De två VCAP certifieringar som finns är ”Design” och ”Administration”. Design-certet är teoretiskt medan Administration-certet är praktiskt.

Kravet med omcertifiering gäller bara för VCP-nivån, så har man tagit steget upp till VCAP så behöver man åtminstone inte i dagsläget ta nytt VCAP-cert om två år. VMware har nu tagit fram ett erbjudande till dig som befintlig VCP där du får 25% rabatt på certifieringar du tar före den 1 januari 2015. Rabatten gäller för maximalt 2 försök per område/typ.

Så passa på att få lite rabatt om du ändå ska ta ett cert! Klicka på länken här under för att komma till sidan:
Current VCPs – Recertify for Less

Terms & Conditions

  • The 25% discount is valid until January 1, 2015.
  • The discount is only valid on the current VCP exams listed above.
  • Only current VCPs who have passed at least one VCP level exam in the past are eligible to use this discount.
  • Candidates can use the 25% discount code a maximum of two times, and only for the same exam, before January 1, 2015.
  • The 25% discount cannot be combined with any other promotions or discounts.
  • VMware reserves the right to change or cancel this offer at any time.
  • The discount cannot be used for non-proctored/online exams, VCAP exams, or for VCDX Application or Defense fees.
  • Training/PSO credits cannot be used for the remainder of the certification exam fee.