The unsung heroes of DRS in vSphere 6.5

VMware vSphere 6.5 has been out for a while now. Some features didn’t get as much publicity as it should, at least in my mind. A few of the really cool features that were introduced in vSphere 6.5 related to DRS, opening up for additional configuration and control of your cluster and virtual machines. It’s found under DRS settings and is called ”Additional Options” where you’ll see 3 new settings:

  • VM distribution

Under normal circumstances DRS will load balance VMs so each virtual machine has the resources it requires, taking into account the cost of vMotioning workloads around to new hosts (as a side note, CPU and RAM has been used since inception of DRS but now it’s also network aware) as one decision-making parameter. This will result in a cluster where you normally won’t see an exact split/distribution/load balancing of the virtual machines cross the hosts, some hosts may be running more VMs than the others. That’s not a problem since the VMs have the resources they need, they are not starved for resources, but the user perception of the DRS functionality is that VMs will be split equally across all hosts. One concern that might require some rethinking of that approach is availability, what if the host running the majority of VMs crash? HA will certainly restart the VMs but a lot of services will be impacted in the environment – Enter VM distribution!

The purpose of VM distribution is to have a fair distribution of VMs on your hosts. Or as it says on one of the official VMware blogs: ”This will cause DRS to spread the count of the VMs evenly across the hosts.”

However, DRS will always prioritize load balancing over the VM spread, so even distribution of VMs is done on a best-effort basis.


  • Memory Metric for Load Balancing

DRS will mainly consider active memory when load balancing, as opposed to consumed or granted memory to VMs. DRS will also take some overhead memory into consideration, so it will use active memory + a 25 % overhead as its primary metric. Active memory is a ”mathematical model that was created in which the hypervisor statistically estimates what Active memory is for a virtual machine by use of a random sampling and some very smart math.  Due diligence was done at the time this was designed to prove the estimation model did represent real life.  So, while it is an estimate, we should not be concerned about its accuracy.”

A really good read on the subject, and where the quote above came from, is “Understanding vSphere Active Memory”.

Now it’s possible to change what memory metric that is used when load balancing, instead of active memory we can use consumed memory. And by the way, the definition of consumed memory: ”Amount of guest physical memory consumed by the virtual machine for guest memory. Consumed memory does not include overhead memory. It includes shared memory and memory that might be reserved, but not actually used.

Virtual machine consumed memory = memory granted – memory saved due to memory sharing” – Quote from “Memory Performance Counters – An Evolved Look at Memory Management”.

This option is equivalent to setting the existing cluster advanced option PercentIdleMBInMemDemand with a value of 100.


  • CPU Over-Commitment

It’s now possible to enforce a specific level of overcommit of vCPU to pCPU resources in the cluster, if you only want to allow 4 virtual CPUs per physical core in your cluster you can now have it configured and enforced by the cluster. When the cluster runs out of pCPU resources you won’t be able to power on any more virtual machines. You define a percentage of over commitment of the entire cluster, setting it from 0 % (= no over commitment allowed or put in another way: 1 vCPU = 1 pCPU) up to 500 %.

vSphere Data Protection

VMware has for a pretty long time integrated (at least license wise) a backup engine with vSphere. It’s available as a stand alone OVA download but once deployed it integrates with the vSphere web client. The current release, version 6.1.3, was brought online on the 15:th of November 2016.

The new release of VMware Data Protection, VDP for short, supports VMware ESXi 5.1 or later, vSAN 5.5 or later.

Since it’s been a while since I last had my hands on VDP,  I thought it be a good idea to see how the product has evolved. How to install, configure, backup and so on.

Full disclosure: Amongst others, I’m a Veeam Certified Trainer but I’ll try my best not to be too biased.

Installation is straight forward, get the VDP OVA from VMware bundled with vSphere and deploy the appliance to a host in your environment. I had some issues with my small home lab, DNS needs to be set up and configured correctly with both forward and reverse lookups. Since I don’t have DNS in my lab I was not able to get passed the initial configuration wizard in the VDP, merely altering the hosts file was not enough. But as usual, whenever I need to google a problem I always wind up on William Lam’s webpage – Thanks William! (note to self: Set the web browser start page to virtuallyghetto.com and save valuable time).

VMware has some best practices when deploying VDP:

    • For a better performance of vSphere Data Protection in a high-scaled environment, where Data Domain is the destination or the target, use the following reference to deploy the number of virtual machines according to the capacity of vSphere Data Protection appliance:
vSphere Data Protection Appliance Capacity Number of Virtual Machines to Deploy
0.5 TB 20
1 TB 30
2 TB 40
4 TB 80
8 TB 100
  • For effective load balancing, deploy a maximum of 10 vSphere Data Protection appliances with 100 virtual machines per vSphere Data Protection appliance, in a single vCenter Server domain.
  • In a large environment, deploy a maximum of 8 proxies per vSphere Data Protection appliance regardless the size of the vSphere Data Protection appliances.
  • For better performance of backups and restores, limit the size of each virtual machine to a maximum of 2 TB.

Installing and configuring the VDP:

Once deployed and configured management of jobs are done using the vSphere web client, first thing to do is to connect to the VDP from the web client:

When connected you have a few options, creating a new backup job, verifying a backup job or restoring a backup. You can also download “Application Backup clients” which can be useful when managing VMs running SQL, Exchange or Sharepoint. The purpose of the agents are to get application consistent backup of VM and have the logs being truncated afterwards.

When you click on the Application Backup clients you end up on the configuration page of the VDP, at the bottom there are links to the individual clients. And on this page you can configure email settings or check log files as well if needed.

Creating a backup job is pretty easy, go through the wizard a change settings, select either “Guest images” or “Applications”. If you select Applications you can select what application and specific database you need to back up.

Select what to backup, entire VM or individual disks.

Now you select which VMs to backup, either select individual VMs or a parent container such as a resource pool or a host (or indeed the entire vCenter server). This is where I find myself questioning VMware’s approach a bit. Why can’t you use folders or tags? Grouping VMs in resource pools just for the sake of backup is a bad thing, resource pools are for dividing up resources and should never be used as a “backup grouping mechanism”. No Tags, folders and so on? Really VMware? Eat your own dog food.

Next you set up the schedule for the backup, you can only set up one backup/restore point per day at most. So you can’t really have advanced scheduling, is backing up a VM once a day good enough? If so then it’s not a problem.

Next, select how long you’d like to keep the restore point. You can either select a simple set up where you set how many days you store the backup or to a specific date but you also have the option of creating a GFS set up. A Grandfather, Father, Son backup is used if you’d like to save weekly, monthly or yearly backups. Nice!

Give the backup job a meaningful name.

Verify that everything is ok.

There you have it, quick and easy to set up. The GUI shows all your available backup jobs on the specific VDP.

Once the backup has been performed you might want to verify that the backup is actually useful, that it can be restored if need be.

Create a new backup verification job.

Select the virtual machines you want to verify.

A heartbeat test will be performed, i.e. the virtual machine will be powered on and VMware will verify that it has a heartbeat to the host (meaning that the operating system of the virtual machine actually started and that the VMware tools service started as well, which will indicated that we have a running OS). But if you provide a script of your own, and have it placed inside the VM you can basically test anything you want. You can perform a much more comprehensive and advanced test for your VMs with a script.

Select a host where you’d like to restore and power on the VM, make sure it has enough resources to actually perform the verification test.

Select the datastore to be used when restoring the VM. Again, the host has to have enough CPU and RAM available to power on the VM but more importantly it has to have enough diskspace as well. Since we have to restore the entire VM the host would need to have free disk space on a datastore. Might not be a problem if we’re verifying a small VM but what about your fileserver or that huge mail server? Do you have X TB available to actually be able to perform the test?

Set a schedule for the verification job, once a week perhaps?

And we give the job a meaningful name.

Verify that everything is ok.

Now we have a summary of all verification jobs available on this VDP server.

It’s possible to either schedule a verification job or to run it manually.

Files of the virtual machine will be restored to the designated datastore and to a folder named VDP_VERIFICATION_<vm-name> -<unique number>.

And there you have it, a successful backup verification performed. Now I have the confidence to restore this particular VM if it would break down for any reason.


Replication:

If you are serious about your backup data you would probably want to design the backup environment in a way that it is protected from a complete site failure. That’s not a problem in VDP, there’s a built in function to replicate your backup information making it easy to have a secondary copy of your data on a remote site.

Backups created with VDP 6.0 or later can be replicated to another VDP appliance, to an EMC Avamar server, or to a Data Domain system.

Emergency!

If you need to restore virtual machines, vCenter and VDP needs to be available however there is a way to restore directly to a host if needed. If for instance you need to restore vCenter itself. The processes is called “Emergency restore” and entails disassociating the VDP from vCenter prior to restoring.

File level restore:

File level restore is possible using the “VDP Restore Client”, no need for an image based backup and a separate file level backup. The VDP Restore Client is accessed using a web browser from the VM to which you want to restore a file. So it has to be running, no redirected restores unless you’re using “Advanced login” then it’s possible to mount any backup file and restore it to the current VM you are running the VDP Restore Client on. And since you have to connect using a web browser to the VDP server from the VM, you’re required to have network connection (and any potential firewall ports opened up for traffic). VMware VIX anyone?

The Good:

  • It’s available on almost all vSphere editions (only missing in the smallest, vSphere Essentials kit).
  • Easy to set up, easy to configure.
  • Verify the backup, always a good thing.
  • You can create GFS retention policies.
  • Since you can replicate backups/VMs to a secondary VDP appliance you can protect your workload from a complete site failure, nice!
  • Makes use of CBT to minimizes the impact of the backup.
  • It has some  basic backup functionality which would go a long way for some environments.

The Bad:

  • The VDP appliance version 6.1 does not support backups and restores of virtual machines on Virtual Volumes (VVOLs).
  • An emergency restore operation restores a VM directly to the host that is running the VDP appliance. And the host running VDP can’t be part of the vCenter inventory, if it does – the host also has to be disassociated with vCenter prior to the emergency restore.
  • The Restore Client service is only available to virtual machines that have backups that are managed by VDP. This requires you to be logged in, either through the vCenter console or some other remote connection, to one of the virtual machines backed up by VDP.
  • If you need advanced scheduling of backups, multiple backups a day of a VM.

Summary:

If I try to summarize, VDP has it’s merits. It’s not the full blown availability solution that for instance Veeam represents but then again VDP is free of charge for all licenses of vSphere (it’s available for vSphere Essentials + and upwards) and is not intended to be used for larger organizations I imagine. It’s very easy to set up and if you don’t have any advanced requirements on your backup it should fill your needs. You do need to be aware of and plan for things like resource consumption for backup verification and how to handle file level restores. And it’s a bit disappointing to find a blog post from 2013 talking about tags and folders as “containers” when creating backup jobs, but nothing has happened yet. It would make a huge difference in terms of management of your jobs.

So, for some organizations, it will be just what the doctor ordered but for others it may be….well, to basic.

My top 5 features of Veeam Availability Suite 9.5

5. Direct restore to Azure
Restore backup from any Veeam backup product to Microsoft Azure: From Backup & Replication, Backup Free edition or Endpoint backup free.
P2V or V2V? Not a problem! This means VMs from any hypervisor or physical machines, even VMs running in any cloud where you can install Endpoint Backup Free or Windows/Linux agents from Veeam are eligible to restore. And it doesn’t matter if you’re running Windows or Linux.

4. Enhanced VMware vCloud Director support for service providers
Let your cloud tenants use native vCloud authentication to access the new self-service backup and restore portal in Enterprise manager. Let them use predefined backup jobs to protect their vApps and restore VMs, vApps or guest files.

3. Proxy affinity
With proxy affinity you can control what proxy servers are allowed to use specific repositories. It’s an easier way with less administration – no need to select individual proxy servers in each and every backup job (if needed) to keep backup traffic local to the site.

2. Cloud Connect for service providers
There are a few functions added to Cloud Connect providers that are not new per se but introduced to Cloud Connect in version 9.5. Such as:
Per-VM backup file chains support
Scale-out Backup repository support
Advanced ReFS integration support

1. Advanced ReFS Integration
Hands down my favorite new function is the ReFS integration. This is a fantastic technology from Microsoft and the integration Veeam made with it in Backup & Replication 9.5 is nothing short of a amazing. Fast clone and spaceless full backup, sounds good right? Who needs dedupe storage anyway? And no need to worry (?) about data integrity with the use of integrity streams that is storage-level corruption guard on steriods.

My top 5 features of VMware vSphere 6.5

5. VMware vCenter High Availability

Since many functions are relying on vCenter being present and available, making the vCenter Server itself highly available is crucial for large scale deployments. In the past there’s been a few solutions that tried to handle this but now it’s already built in when you fire up your server. If you’re using the vCenter Server Appliance you have the ability to configure it to run in a high availability fashion using “vCenter High Availability”. Now, I need to emphasize, this is exclusively for the vCenter Server Appliance and not for the windows version of vCenter. You get an active node, a passive node and a witness node that makes the vCenter Server availabile by a click of a button. Simple.

4. vSphere Update Manager

Not really a new thing but since vCenter 6.5, vSphere Update Manager is now available for the vCenter Server Appliance as well – making a separate server unnecessary. Finally!

3. VMware PowerCLI

I’m a huge fan of automating and quite frankly PowerCli has to be on the list based on that fact alone, but there are some significant improvements to the different modules. A big leap forward in terms of automation.

2. Virtual Machine Encryption

For the security conscious people out there, this should be a huge deal. The ability to encrypt virtual machines from the outside means it’s independent of the OS inside and also that it’s storage agnostic.

1. Enhancements for Nested ESXi

I do a lot of demos and testing in lab environments I really appreciate the improvements made for nested environments. There has been a fling available for some time that basically reduced the traffic and load on the individual hosts through a MAC learning algorithm. It has now been integrated in the full release of vSphere 6.5. This results in significant performance improvement in nested ESXi environments with vSphere 6.5.

And a honorable mention goes to vSAN 6.5 with improvements such as iSCSI support for physical workloads, 2 node direct connect for the small deployments and of course PowerCLI cmdlets support for vSAN.

VMware vSAN iSCSI use case?

In a previous post I went through a list of my personal favorite features in vSphere 6.5. VMware vSAN is on of them, it’s a storage solution that handles your virtual machines – amongst others as we shall see today.

One of the nicest features introduced for vSAN in vSphere 6.5 is the ability to attach physical servers to the vSAN cluster. By letting the vSAN handle the iSCSI volume, since it’s just another object in the vSAN, you can apply the same policies on that volume as you do on the vSAN datastore used for you virtual machines. And that means you’re able to manage the performance and/or availability, not just when initially setting up the volume but any time the requirements change for the volume you’re able to adapt.

So is it hard setting up vSAN with iSCSI targets and attaching physical servers to it? Not at all, it’s quite easy actually. Let me show you how easy it is. But first we have to create a vSphere cluster with vSAN enabled and configured. Now, I’m a big fan of PowerCLI and automating a lab environment set-up is thanks to William Lam a breeze. I’ve adjusted his script slightly to allow me to select 3 different sizes of the ESXi hosts to choose from: small, medium or large. This allows me within 30 minutes to have a lab consisting of 3 ESXi hosts and a vCenter appliance up and running, configured with a cluster and vSAN enabled. The medium and large size configurations would normally be used for VMware NSX labs and demos.

It might not be the intended use case, but wouldn’t it be fun to host virtual machines from a Hyper-v environment on a vSAN? “Why?” I hear you say, no reason, just because we can!

PowerCLI

So first thing is to execute the PowerCLI script to bring my lab environment online:

Logging on to vCenter will now show the three hosts in a cluster with a new datastore created, a vSAN datastore.

Next, we need to enable the iSCSI functionality, which is a simple process:

Enabling the Virtual SAN iSCSI target service requires some input, specifically

  • Default iSCSI network to use – in a production environment you’d probably want to set up a dedicated VMkernel iSCSI interface for this.
  • Default TCP port – usually no need to change this
  • Default authentication – If you’d like you can set up the connection to use either None, CHAP or Mutual CHAP
  • Storage Policy for the home object – Using the predefined storage policies you can have the home object that stores metadata for the iSCSI target protected for host failures

If you want, you can create a new policy with specific settings for iSCSI Targets and Home object:

The default vSAN storage policy is used.

It protects you against one host failure, to do that it will have the object placed on two different hosts. This means it will use twice the space assigned to an object/VMDK file from the vSAN datastore.

Next up, creating a target and LUN:

You create both the Target IQN (with the desired settings and policies) and a LUN. Depending on the LUN Storage Policy you are using you will consume space from the vSAN datastore accordingly:

Now the set-up of the Target and the LUN is done. It’s that simple! After this point you can attach any physical server using iSCSI to the vSAN datastore and use the resources. In my lab though, I’m going to use a virtual machine from another host to emulate a physical machine.

You probably don’t want just any old server being able to attach to the LUN, so you can configure which initiators are allowed to connect. Either use individual IQNs or create a group of IQNs.

Let’s take a look what has happened on the vSAN Datastore:

We can now clearly see that there’s a new VMDK file that we can handle just as any other VMDK file, inflate it, move it or delete it:

Next up: Creating a Windows Server 2016 VM (emulating a physical machine) that will connect and use the new vSAN LUN we created. 

Setting up the VM is pretty straight forward.

Select the desired OS:

Here’s where we need to make changes, first assign at least two CPUs to the VM and secondly tick the box for hardware virtualization (otherwise the role Hyper-V won’t be able to start or be installed).

The summary page shows us what settings we’ve selected for the VM

We run through the installation of the operating system. Configure everything we need, a static IP address, updating windows and so on:

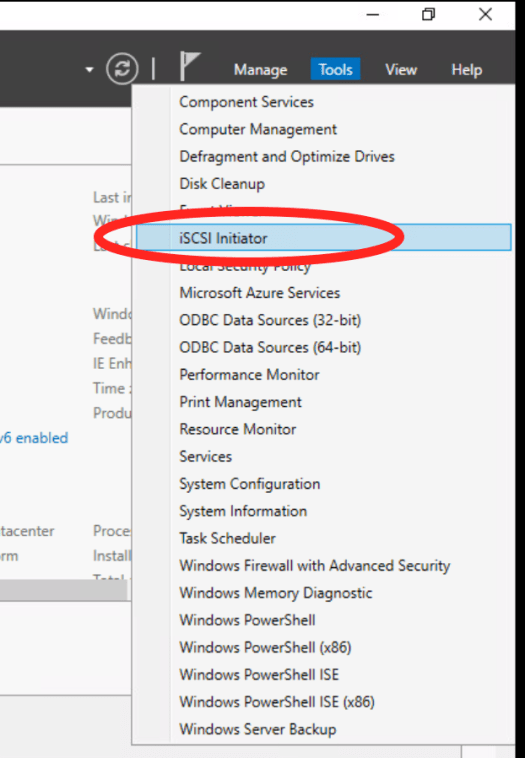
OK, Windows Server 2016 is ready to be used, let’s configure the iSCSI connection:

Yes, we’d like to start the iSCSI service:

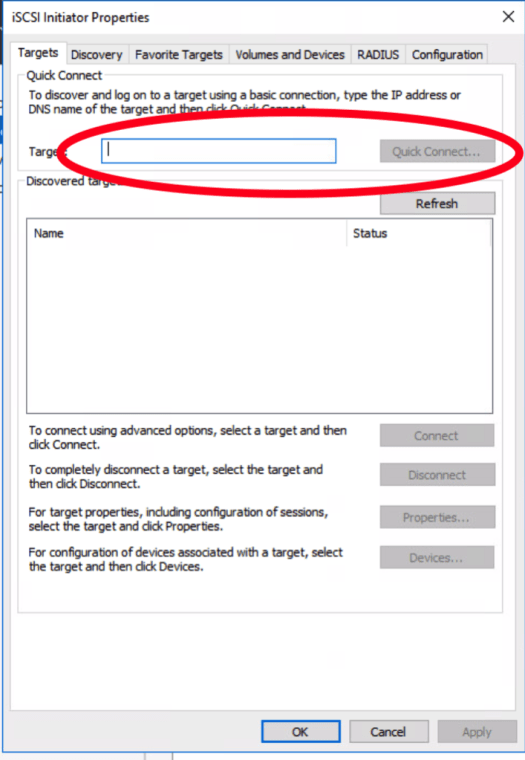
Again, in a production environment you’d probably want to have som fancy stuff set up such as MPIO and so on but for this test we’ll just do a quick connect to the iSCSI target:

Oh, but what IP address should I use? The host that is responsible for the I/O to the LUN can be found on the configuration page of the iSCSI Target:

We connect Windows to the I/O Owner host:

We have a connection, all is well:

Open up the disk management tool and a new disk should be available (if not, try a rescan). Bring the disk online, initialize it and format it:

Give the volume a name:

Now the volume is ready to be used:

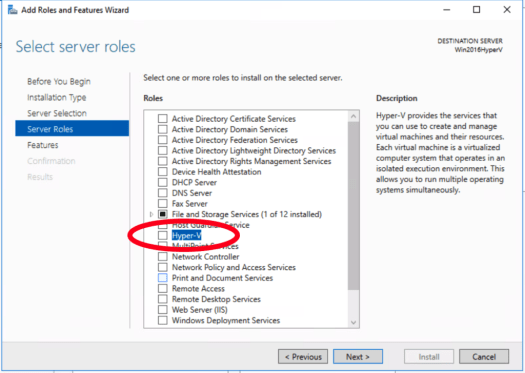
Hyper-v will now be installed on the Windows Server 2016 machine:

Add the required features and tools

Configure a virtual switch for Hyper-V

Now we can actually leverage the newly created vSAN volume and use that as the target for our Hyper-V virtual machines:

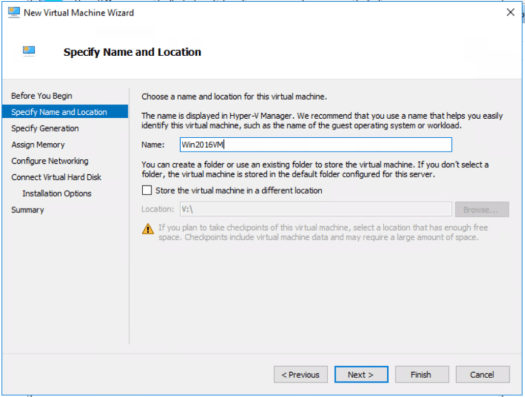
A simple test to confirm that it actually works, creating a virtual machine for Hyper-V running off of the vSAN volume:

Go through the wizard, give the VM a name and so on.

Choose what generation the VM should be created as:

Select a network connection if needed

Set the size of the virtual hard disk.

Select an iso-file to be used when installing the OS in the Hyper-V virtual machine

Done, just hit finish

The VM is created, start it and connect to it to get the console view

Install the operating system and update it, configure it the way you want it

Now we’re running a virtual machine in Hyper-V with it’s disk being handled by VMware vSAN! Pretty cool.

Now we can go back to see what impact, if any, installing the operating system had on consumed space on the vSAN volume:

As you can see, the VMDK file containing the Hyper-V volume has grown that’s just as we expected.

There you have it! It’s very, very easy to set up vSAN to use iSCSI – why not give it a try yourself?

Windows 2016 ReFS as a Veeam backup repository?

Do we really need dedupe storage for our long term backups? Well, dedupe storage certainly has it’s merits in the toolbox when you design your backup environment. But we do need to be aware of some of the drawbacks with dedupe, for instance performance for random I/O and rehydration of data if doing synthetic full backups. However, there’s been a great disturbance in the Force as of recently.

Microsoft made a huge release earlier this year with the “2016”-suite, I thought it’d be a good idea to go through how to set up a server to be used as a repository for Veeam Backup & replication 9.5 and show some of the results. More specifically, let’s use the amazing Resilient File System (ReFS) v3 found in Windows Server 2016.

Windows Server 2016 can be installed in two modes, with or without a GUI. Now, if no GUI is installed you can use powershell to do the configuration but for simplicity we’re going to use the GUI which is called “Desktop experience” in the installer.

So boot your server from the dvd/iso and select Windows Server 2016 (Desktop Experience) of your flavor.

Desktop Experience

In the next step, select “Custom: Install windows only (advanced)”

Install

Select the drive to install Windows on:

C drive

Now the installation will start copying files to the drive and commence the installation of Windows.

Start installation

Click on Tools and select Computer Management in the server manager window:

Computer management

Open up the Disk management tool, this is where you find the attached drives on the server. In my case I have one drive where I installed windows and two additional drives. I’ll make some benchmarks later so I’m going to format one drive with ReFS and the other one with NTFS for comparison, but first let’s get them online:

Disk online

Then initialize the disks:

Initialize disk

Next up, we create a new simple volume on one of the disks:

Simple kolumn

Select file system and give the volume a name:

ReFS volume

Next disk we format with NTFS instead:

100

The result looks like this:

110

So let’s test it out and see if there’s any noticeable difference when using these as target for our backups.

I’ve created a folder on each of the disks and made two Veeam Backup Repositories, I’ve created two jobs backing up the same VM running Windows Server 2016(with different targets) and set up synthetic full backup, this is where Windows ReFS should really shine if you believe the hype.

Backup jobs

When the backup has run a few iterations it was time for the Synthetic Full backup using the NTFS backup repository as target:

NTFS Usage

So with NTFS, a full backup, a few incremental backups and at the end a Synthetic full backup used roughly 12 GB of disk space. Good deduplication and compression and not a lot of changes in the VM of course. But what about the ReFS repository?

Usage ReFS

Same backup intervall with a Synthetic full backup at the end generated roughly 7 GB go disk usage, pretty significant reduction in usage if you ask me. Now disk usage is when of the key features on why to use ReFS with it’s “spaceless full backup technology” but there’s another benefit the has the same groundbreaking impact: Time.

Time it takes to make the full backup. Let’s take a look at the time it took to create the synthetic full backup on the NTFS repo.

NTFS synthetic full4 minutes and 15 seconds is not the bad for my VM, but imagine it being dozens of VMs…How does the ReFS repo compare then?

ReFS synthetic full11 seconds! Must be a typo? NO, it’s really not. Quite impressive. Now you might rethink the dedupe storage approach, you have all the space savings (almost) of the dedupe storage but performance of a traditional disk with no need to rehydrate data.

If you want to make it highly resilient you can leverage another Microsoft technology called Storage Spaces Direct where you’d get fault tolerance and “auto-healing” as well.

A fantastic job from Microsoft with ReFS/Storage Spaces Direct and Veeam with the integration of the technology into Backup & Replication!

Veeam, PowerShell and SAN snapshot

So a week or so ago I wrote a post about using PowerShell to add snapshots to a SAN found in Veeam Backup & Replication. It was a quick test to see if it worked, now I’ve slightly improved the script.

The Get-HP4* cmdlets is specifically for HPE StoreVirtual VSA/P4000/LeftHand line. If you have another supported SAN Storage system use the correct cmdlets:

NetAPP Storage Systems
HPE 3Par StoreServ Storage Systems
HPE StoreVirtual Storage Systems
EMC VNX Storage Systems

You can accomplish the same thing using the management tool for the SAN, taking recurring snapshots. But in the case of HPE StoreVirtual it’s a licensed feature and it can only occur every 30 minutes so if you need it more often or you’re lacking the license you can use the PowerShell script instead.

Add-PSSnapin VeeamPSSnapIn -ErrorAction SilentlyContinue

$source_storage = ‘Veeam-VSA-MGMTG’
$source_cluster = ‘veeam-vsa-cluster’
$source_vol_name = ‘datastore1’
$snapshot_name = ‘Oh_snap_’+(Get-Date -Format MMddhhmm)

#Create a new snapshot
try {
‘Trying:’
$getvolume = (Get-HP4Storage -Name $source_storage | Get-HP4cluster -Name $source_cluster | Get-HP4Volume -name $source_vol_name)
‘getvolume-Name: ‘ + $getvolume.Name
‘getvolume-InternalId: ‘ + $getvolume.InternalId
‘getvolume-IsThin: ‘ + $getvolume.IsThinProvision
‘getvolume-Size: ‘ + $getvolume.Size

$getvolume | Add-HP4Snapshot -name $snapshot_name
} catch {
‘Failed to find storage, cluster or datastore’
‘Unable to create snapshot’
break
}

#Remove the oldest snapshot if more than 4 are available
$getsnapshot = ($getvolume | Get-HP4Snapshot | Where-Object {$_.Name -like ‘Oh_snap_*’})
$snapshot_count = @($getsnapshot).Count

if ($snapshot_count -ge 4) {
$getsnapshot | Sort-Object creationtimeutc | Select-Object -First 1 | Remove-HP4Snapshot
}

Populate your Veeam lab with PowerShell

If you, like me, have the need to constantly rebuild a lab environment where the servers are installed already but it lacks any configuration you probably realized that PowerShell is you friend. I have a lab environment that I tear down and build up again really often using templates in my VMware environment. In this environment I have all the infrastructure components installed but not configured in Veeam Backup & Replication so whenever I want to show-and-tell I first need to configure stuff. It might take a while to do, so why not automate with PowerShell?

The script below adds a few managed servers, adds backup proxies, creates a Scale-Out Backup Repository with 2 extents, adds 2 WAN accelerators. On top of that it adds a Tape proxy, connects to a HP VSA and takes a snapshot.

Add-PSSnapin VeeamPSSnapIn -ErrorAction SilentlyContinue

$Infra_Administrator = "Domain1\Administrator"
$Infra_Password = 'Password1'
$Lab_Administrator = "Domain2\Administrator"
$Lab_Password = 'Password2'
$ESXi_root = "root"
$ESXi_Password = 'Password3'
$Oracle_User = "oracle"
$Oracle_Password = 'Password4'
$HPE_User = 'HpeUser'
$HPE_Password = 'Password5'
$VBRserver = Get-VBRServer -Name "VEEAM-VBR.domain1.local"

Add-VBRCredentials -Type Windows -User $Infra_Administrator -Password $Infra_Password -Description $Infra_Administrator
Add-VBRCredentials -Type Windows -User $Lab_Administrator -Password $Lab_Password -Description $Lab_Administrator
Add-VBRCredentials -Type Linux -User $Oracle_User -Password $Oracle_Password -SshPort 23 -ElevateToRoot -AddToSudoers -RootPassword $Oracle_Password -Description "oracle"

#Add servers as ”managed servers”
Add-VBRESXi –Name "VEEAM-ESX" -user root -password 'Password3'
Add-VBRWinServer -Name "VEEAM-HYPERV" -credentials $Infra_Administrator
Add-VBRWinServer -Name "VEEAM-Remote" -credentials $Infra_Administrator
Add-VBRHvHost -Name "VEEAM-HYPERV" -credentials $Infra_Administrator

#Remove/Add proxy with 1 concurrent task limit
Get-VBRViProxy -Name "VMware Backup Proxy" | Remove-VBRViProxy -Confirm
Add-VBRViProxy -Server $VBRserver -Description "VMware Backup Proxy" -MaxTasks 1

#Add Backup Repositories and Scale-Out Backup Repository
Add-VBRBackupRepository -Server $VBRserver -Name "Remote Repository" -Folder "X:\Backups" -Type WinLocal -MaxConcurrentJobs 4 -Credentials $Infra_Administrator
Add-VBRBackupRepository -Name "Local Backup Repository" -Server $VBRserver -Folder "E:\Backups" -Type WinLocal -MountServer $VBRserver -VPowerNFSFolder "C:\ProgramData\Veeam\Backup\NfsDatastore" -MaxConcurrentJobs 4 -Credentials $Infra_Administrator
Set-VBRConfigurationBackupJob -Repository "Remote Repository"
Add-VBRScaleOutBackupRepository -Name "Main Backup Repository" –PolicyType DataLocality –Extent “Default Backup Repository”, “Local Backup Repository”

#Add WAN accelerators
Add-VBRWANAccelerator -Server "VEEAM-Remote" -Description "Remote WAN Accelerator" -CachePath "X:\VeeamWAN" -CacheSize 10 -CacheSizeUnit GB
Get-VBRLocalhost | Add-VBRWANAccelerator -Description "Local WAN Accelerator" -CachePath "X:\VeeamWAN" -CacheSize 10 -CacheSizeUnit GB

#Add a Virtual Lab and Application group
$VLABhost = Get-VBRServer -Type ESXi
$VLABdatastore = Find-VBRViDatastore -Name "datastore1" -Server $VLABhost
Add-VSBVirtualLab -Name "VEEAM-ESX VLAB1" -Server $VLABhost -Datastore $VLABdatastore

Find-VBRViEntity -Name "VEEAM-DC01", "VEEAM-EX01" | Add-VSBViApplicationGroup -Name "Exchange"

#Add SAN and Tape and make a snapshot on the SAN
Add-HP4Storage -DnsOrIpAddress "10.20.30.40" -User $HPE_User -Password $HPE_Password -Description "HPE Storage"
Get-VBRServer -Name "VEEAM-Remote" | Add-VBRTapeServer
Get-HP4Volume -name "datastore1" | Add-HP4Snapshot -name "datastore1_SS_1"

Veeam and PowerShell: A perfect match!

I read a really good and useful blog post a while ago from Preben Berg from Veeam describing how to use PowerShell to restore a database from backup to a dev environment. This made me think on another scenario that would be fun to script that might come in handy someday.

What if you have a SAN that you would want do snapshots on once an hour and save some of those historical snapshots rotating the oldest one.

Now for the disclaimer part, this is merely meant to showcase how you might accomplish this. There are no safety features built in. Do not use it in production and use it at your own risk. However if you’d like to do some further testing of your own, you can download a virtual SAN from HP – free of charge up to 1 TB. Nice!

First things first. We need to create a PowerShell script.

Let’s define which volume to use:
$source_vol_name = "datastore1"

Then we add a naming convention to use for the snapshots with a timestamp at the end:
$snapshot_name = "Oh_snap_"+(Get-Date -Format MMddhhmm)

Let’s count how many snapshots exist on the volume:
$snapshot_count = @(Get-HP4Volume -name $source_vol_name | Get-HP4Snapshot).Count

Now let’s create a snapshot:
$snapshot_create_session = Get-HP4Volume -name $source_vol_name | Add-HP4Snapshot -name $snapshot_name -description "Automated snapshot"

I would like to save the 4 latest snapshots on the volume and delete the oldest:
if ($snapshot_count -ge 4 {
$snapshot_remove_session = Get-HP4Volume -name $source_vol_name | Get-HP4Snapshot | Sort-Object creationtimeutc | Select-Object -First 1 | Remove-HP4Snapshot
}

If I would leave out “Get-HP4Volume -name $source_vol_name”  in the above statement then I would delete to oldest snapshot available on any of the volumes (not just datastore1) which is not our intent.

Let’s put it all together:

Add-PSSnapin VeeamPSSnapIn -ErrorAction SilentlyContinue

$source_vol_name = “datastore1”
$snapshot_name = “Oh_snap_”+(Get-Date -Format MMddhhmm)
$snapshot_count = @(Get-HP4Volume -name $source_vol_name | Get-HP4Snapshot).Count

$snapshot_create_session = Get-HP4Volume -name $source_vol_name | Add-HP4Snapshot -name $snapshot_name -description “Automated snapshot”

if ($snapshot_count -ge 4 {
$snapshot_remove_session = Get-HP4Volume -name $source_vol_name | Get-HP4Snapshot | Sort-Object creationtimeutc | Select-Object -First 1 | Remove-HP4Snapshot
}

That’s all, just a few lines of code and we can accomplish cool things.

Then all we have to do is add the script as a scheduled task on the VBR server and run it once an hour or what ever intervall we’d like.

But let’s see how the infrastructure looks prior to running the script:

1. SAN datastores


Open Task Scheduler and create a new task:

2. Create scheduled task


Let’s configure it to run once an hour starting at 10 PM:

3. Run at 1 hour intervall


We add and action, starting the PowerShell script:

4. Add PowerShell script to run


Looks ok once it’s added:

5. Scheduled task has been added


First time the script ran a snapshot was created as expected:

6. First run of the script


(I changed the script to run every 5 minutes to speed up the process), now we have 4 snapshots:

7. 4 initial snaps


When the fifth snapshot has been taken the oldest snapshot is deleted (the snapshot created at 10:07 PM in the previous picture):

8. 4 snaps rolling


Is Bitlooker from Veeam a game-changer?

Disclaimer: This is not a performance comparison or test in any way, shape or form, it is merely my experience in a lab environment supposed to show an indicative relative difference in performance at a high level. OK, you get the picture?

So as you may know Veeam introduced a new feature in version 9 of Backup & Replication and I thought it would be fun to see if there were any actual benefits of using the feature called “Bitlooker” by doing some basic tests. The goal of my test was to see if there were any differences in running backup jobs with or without backing up dirty blocks (i.e blocks that contains data but has been marked as deleted and thus the blocks can be reused by the operating system) which is the actual functionality of Bitlooker. My starting position was that logically it makes sense of course that it would be more efficient in a lot of ways using Bitlooker but I wanted to see if it was quantifiable: difference in speed and/or backup file size – again at a high level. And as an extended test I also wanted to see if there was any notable difference between using Bitlooker and SDelete (a tool from Sysinternals that you run inside the guest OS to clean up dirty blocks by writing zeros to those blocks).

Description of the Test environment
A Veeam Backup & Replication environment was set up, using simple deployment (all services on a single VM). A virtual machine running Windows Server 2012 was set up as the VM to be backed up running on a vSphere 5.5 host. Anyone familiar with the VMCE lab environment, that’s basically what I was using with and extended drive on on one of the domain controllers. The domain controller was assigned a 200 GB thin disk. I filled the disk with 190 GB worth of data, deleted 160 GB of data and then went ahead with some comparison tests. To describe what actually happens inside the OS at this point, only pointers to blocks containing information is deleted not the actual data on the blocks themselves which means that the OS will know the actual consumption on disk but for an outside observer (vSphere and Veeam for instance) it makes no difference: a block containing data is a block containing data.

Since I’m running the tests on my brand new toy, a Gen 6 Intel NUC which is not an enterprise server, I’m not that interested in the actual performance figures but rather the relative difference between the different test scenarios – all else equal. Oh, but there’s just one thing: Bitlooker only works with Windows and NTFS filesystem.

I initially performed some tests on a 40 GB VM but felt that, even though I saw some great improvements, I couldn’t draw any actual conclusions based on them.

I quickly realized – “We’re gonna need a bigger boat!” and went for the 200 GB drive instead.

Since I already had performed some initial tests on my 40 GB environment the relevant scenarios at this point started at Test 8. All backup jobs were set up to take active full backup of the VM:

Test 8: A 200 GB vmdk where approx 40 GB was consumed. Basic backup test without Bitlooker enabled.

23 - Test 8 - Veeam GUI

24 - Test 8 - filesize

The resulting vbk-files from the 200 GB vmdk containing 40 GB of data is 12 GB in size.

Test 9: A lot of files were added to the VM, roughly 150 GB worth of data. Now the total consumed size of the disk is 191 GB. Again a basic backup test without Bitlooker enabled.

25 - Volume size pre-deletion of files

26 - VMDK size pre-deletion of files

A quick look shows the vmdk to be 200 GB in size.

27 - Test 9 - Veeam GUI

28 - Test 9 - filesize

With compression and deduplication the vbk-file ends up 95 GB in size.

Test 10: Now the fun begins, 163 GB of data was deleted and backup runs without Bitlooker.

29 - Size of files to be deleted

30 - VMDK size post deletion

Even though the files inside the OS has been deleted, the actual vmdk-file size doesn’t change and that’s expected behaviour from a thin disk. And it wouldn’t change even if you made a storage vMotion.

31 - Test 10 - Veeam GUI

32 - Test 10 - file size

This is  where it starts getting interesting, the vbk-file size is still the same size as we saw in the previous test: 95 GB! By logic it should be smaller since we’ve deleted 163 GB of data but clearly from the outside it doesn’t matter – a block is a block is a block.

Test 11: This is where we put Bitlooker to the test, same scenario as Test 10 but Bitlooker has been enabled on the backup job. That’s the only difference, a tick in a box.

33 - Test 11 - Veeam GUI

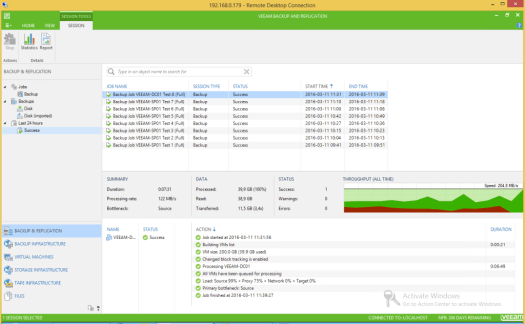
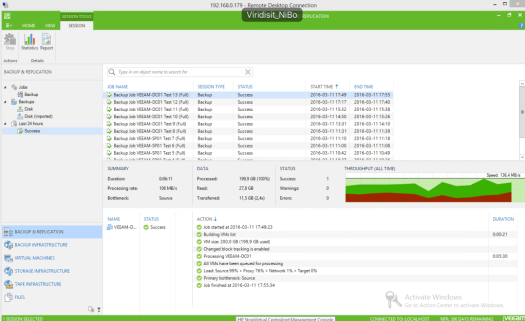
One big thing to highlight on the picture above is time spent backing up the virtual machine, 6 minutes compared almost 36 minutes in “Test 10”. That’s a huge difference, and the end result will still contain the exact same active data from the VM.

34 - Test 11 - filesize

Massive reduction, we’re now seeing vbk-sizes similar to the first initial backup test in “Test 8”.

Test 12: So let’s see if all types of “zeroing”-techniques are equal. We’re now using SDelete to do it’s job on the C-drive zeroing out all deleted blocks and the backup job runs without Bitlooker.

35 - C drive zapped with SDelete

36 - Test 12 - Veeam GUI

It performs faster than “Test 10” but slower than “Test 11”, that’s interesting! I wasn’t really expecting such a big difference I must admit.

37 - Test 12 - filesize

The backup file size is identical as “Test 10” though, and that was expected.

Test 13: So for fun let’s enable Bitlooker on the job, so SDelete and Bitlooker in conjunction.

38 - Test 13 - Veeam GUI

Bitsocker comes in to play again reducing the backup time to 6 minutes.

39 - Test 13 - filesize

No change in backup file size, that was expected. So there’s no benefit what so ever in this scenario of using SDelete.

Test 14 – Extra test: Since there was such a difference between “Test 12” and “Test 13” let’s verify the behaviour by disabling Bitlooker and run the job again. This should mean more time spent on the backup, right?

40 - Test 12 verification - Veeam GUI

Yep, we’re back again pushing past 23 minutes for the job.

41 - Test 12 verification - filesize

Backup file size doesn’t change.

Conclusion
Reducing the amount of data to backup from your virtual machines has always been a good thing, how ever historically it has been a manual or at least semi-manual task to accomplish, running SDelete.exe or some eqvivalent tool for instance. Perhaps running as a scheduled task but nonetheless it had to run on the VM itself and would require time and valuable CPU and I/O resoruces in the process. It was also prone to human “error” since someone had to actual run the command or set up a schedule for it – meaning it might be forgotten or missed setting up new VMs. It’s worth mentioning that SDelete is a few years old and that there are other tools available you can use, one of which is a fling from VMware called GuestReclaim but I couldn’t use it in this case since it doesn’t work under Windows Server 2012.

Bitlooker changes the game completely, you literally only have to tick a box on a backupjob to make use of it! Faster backup times and smaller backup files, are there any drawbacks? Well yes and no, if you’re a windows shop go nuts with it but if you’re running any other OS you simply won’t be able to use Bitlooker.

Bitlooker is a great new feature from Veeam, not only does it reduce storage space required to hold your backup files but it also reduces backup time significantly for your active full backups (to be clear it will also make a difference on your incremental backups). As I already mentioned the tests were done on a tiny lab environment but it can still act as an eye-opener in terms of
relative difference with or without bitlooker enabled. Your own milage may vary, but you will see improvements. I tested 1 VM just for fun but I bet you have a lot more VMs, do you think you will save time? I’m sure of it!

“So what about cost? How much do I need to fork out for this great new feature you speak of?” I hear you say. That’s almost the best part: Nothing! You don’t need to pay anything! As long as you have a valid license and support contract you can just upgrade, it’s included in version 9 of Backup & Replication and for all editions: Standard, Enterprise and Enterprise Plus. For all new jobs created it’s even enabled by default and it can easily be enabled on your existing jobs – just tick the box. Thank you Veeam!

I would recommend enabling this feature on all your backups if you haven’t done so already. Period.

So ending with answering my question in the subject: Yes! It really is.