Veeam Backup & Replication update 3 released!

Update 3 has just been released for Veeam Backup & Replication. Update 3 comes with a lot of new cool functionality:

Storage Snapshots Integrations
New strategic partnerships and storage integrations include:

  • IBM Spectrum Virtualize – IBM SAN Volume Controller (SVC) and the IBM Storwize family
  • Lenovo Storage V series

Bringing functionalities to these arrays like Backup from Storage Snapshots, Explorers for Storage Snapshots

Recycle bin for Cloud Connect
As a way of protecting backups from maliciously being deleted if someone gets access to the tenants credentials, deleted backups will now be placed in a recycle bin for a configurable amount of days but to the user they’re gone. This way it will still be possible to retrieve backup files and restore VMs and/or files even though from a user perspective the backup files seems lost. Once the backup files have been deleted and temporarily placed in the recycle bin, the backup files will not consume valuable resources from the disk quota. When the deleted backup files needs to be used the tenant has to contact the service provider to have the service provider restore the backup files from the recycle bin back to the tenants repository.

VMware Cloud on AWS
Support for backing up VMs running och VMware Cloud on AWS

Veeam ONE
Agent monitoring and reporting

  • Protected agents
  • Agent backup status
  • Identify agents with no backup copy

Backup Compliance reporting

  • Geolocation of Data Protection Report: List all data sources grouped by production location and location of their copies/replicas
  • Data Geolocation Mismatch Report: List all data sources that have one or more copies where the location is different from the production data

Agent only use: 0-socket license required for enabling advanced funtionalities (Scale-Out Backup repository, Tape, WAN accelerator) in Backup & Replication when using agents if you’re not using Backup & Replication for backing up any virtual environment.

Veeam Agents
Centralized deployment and management giving you a single pane of glass for all backups and restores regardless of location in the environment – VMs or physical servers, you can even install Agents on VMs running in the Cloud or on any hypervisor.

Veeam Agents for Microsoft Windows 2.1

  • Windows Failover Cluster
    • Includes SQL AlwaysOn, Windows Failover Cluster and Exchange Database Availability Groups
  • Change Block tracking driver for faster incremental backups of Windows Servers
  • Microsoft OneDrive support as a backup target

This means you can you Veeam Explorers to restore application-items from Exchange, SQL

Veeam Agents for Linux 2.0

  • Scale-Out Backup Repository
  • Direct backup to Cloud Connect
  • Source side encryption

Release notes can be found here

In 5 minutes: Veeam Cloud Connect

Time again for a new episode in the “in 5 minutes” series. Today I’ll be discussing Veeam Cloud Connect.

Swedish only!

In 5 minutes: Veeam ONE

Next up: Veeam ONE. A solution for many things, such as:

Monitoring
Reporting
Capacity planning

Let’s have a short discussion.

Swedish only.

In 5 minutes: Veeam Backup & Replication

The series continues with Veeam’s flagship product for backing up and restoring virtual machines, files and objects from applications. And replicating VMs.

Swedish only.

How and why series – Veeam Backup & Replication SureBackup

After the first episode of my “How and why”-series in which I talked about VMware VSAN I thought it’d be fun to show you why I love Veeam so much and in particular the function SureBackup. SureBackup is all about verifying your backup data (your VMs) in a super smart way. The bottom line is, if you need to restore anything you KNOW that the restore will work.

Again, the video is in swedish only.

(Re)claim your space!

In one of my previous posts, Is Bitlooker from Veeam a game-changer?, I wrote about the benefits of using Bitlooker for backup jobs when using Veeam Backup & Replication v9.x however Bitlooker is a feature that is not only available for backup jobs – you can use it for replication jobs as well.

So I thought it’d be fun to see what difference, if any, it makes. The goal of my tests is to figure out the most effective way of copying/replicating a VM from one host to another.

The set up for the test:

A virtual machine is installed with Windows Server 2016 standard edition. 100 GB disk assigned to the VM, thin provisioned. The disk is then filled with files (a bunch of iso-files of different sizes). That’s the baseline, then roughly 85 GB will be deleted (all the added iso-files) – then trashcan will be emptied. So we’ll have some blocks containing stale/old data, the blocks are marked as available to be reused from the operating system point of view but they haven’t been zeroed out so from any hypervisor (outside the VM) it just looks as any other block containing data.

Operating system installed (Windows Server 2016) and updated. The VM now consumes 13,5 GB worth of storage.

Then a bunch of files were added (almost) filling the entire disk.

From the vSphere side of it:

At this point the just added files were removed and trashcan emptied.

And from vSphere:

Now the command ‘ls’ will not show the actual size, so ‘du’ can be used instead to see the actual size of the vmdk file:

I’m going to test 4 different scenarios:

  1.  Migrate the VM from one host to another offline (VM will be shutdown).
  2. Replicating the virtual machine with VMware vSphere Replication 6.5.
  3. Replicating the virtual machine with Veeam Backup & Replication without Bitlooker enabled.
  4. Replicating the virtual machine with Veeam Bitlooker enabled.

The thesis, or point to prove, is that test 1-3 will have no or little impact on the size of the vmdk file however – magic will happen on test 4. So lets perform the tests and find out for real!

Test 1:

VM moved to another host while offline and now let’s explore what can be seen using different methods.

Inside the VM:

From the host:

So no change in vmdk file size as expected.

Test 2:

The virtual machine will be replicated to another host using VMware vSphere Replication 6.5.

VMware vSphere has been configured using the following settings:

Not alot of settings, in fact, the above settings will have no impact on the vmdk size. They will only have control how the snapshot on the VM will be generated (crash consistent vs consistent backup) and the impact the replication job will have on the network.

Inside the VM:

From the host:

Since ‘ls’ doesn’t show the actual size on a thin disk, disk usage ‘du’ is used instead:

So no change in vmdk file size as expected.

Test 3:

The virtual machine is replicated to another host using Veeam Backup & Replication v9.5.

Replication from a Veeam perspective has been set up, to make a fair comparison to the VMware replication test (test 2), the Veeam job will not use exclude swap file blocks:

Processed and read data in the picture below tells us that Veeam doesn’t know the difference between blocks in use and blocks marked as deleted (the same applies for almost all backup vendors):

Inside the VM:

From the host:

And using ‘du’:

So no change in vmdk file size as expected.


Test 4:

Know time for the fun stuff. The virtual machine will be replicated to another host using Veeam Backup & Replication v9.5. We will use both space saving techniques we can enable on the job (with application-aware processing we can also exclude specific files, folders, file extensions but we’re not using that feature in this test)

Now, this is the magic we were looking for! The  proxy server has processed all of the data but it has only read data that contain used blocks!

From the VM:

From the host:

Now the vSphere web client combine the .vmdk and -flat.vmdk file into one (like it’s done forever):

And the disk usage utility shows:

Yikes! That’s cool stuff!

Conclusion:

Bitlooker is a feature you should have enabled on any relevant job. It certainly can be used to reclaim that precious storage space you so desperately need.  Heck, why no use it as part of your normal failover testing, cause you’ll already doing that right? Once a month (or how often you feel appropriate) do a planned failover using Veeam Backup & Replication, verify that you DR plan works and as an added bonus you reclaim disk space in the process!

And yet another benefit is the spent replicating the virtual machine, without Bitlooker it took 30 minutes to replicate the VM from one host to another but it was just shy of 7 minutes with Bitlooker enabled.

So seriously, why are you not using this magic thing? There’s only one drawback, Bitlooker supports only NTFS file system (=Windows VMs).

Veeam, PowerShell and SAN snapshot

So a week or so ago I wrote a post about using PowerShell to add snapshots to a SAN found in Veeam Backup & Replication. It was a quick test to see if it worked, now I’ve slightly improved the script.

The Get-HP4* cmdlets is specifically for HPE StoreVirtual VSA/P4000/LeftHand line. If you have another supported SAN Storage system use the correct cmdlets:

NetAPP Storage Systems
HPE 3Par StoreServ Storage Systems
HPE StoreVirtual Storage Systems
EMC VNX Storage Systems

You can accomplish the same thing using the management tool for the SAN, taking recurring snapshots. But in the case of HPE StoreVirtual it’s a licensed feature and it can only occur every 30 minutes so if you need it more often or you’re lacking the license you can use the PowerShell script instead.

Add-PSSnapin VeeamPSSnapIn -ErrorAction SilentlyContinue

$source_storage = ‘Veeam-VSA-MGMTG’
$source_cluster = ‘veeam-vsa-cluster’
$source_vol_name = ‘datastore1’
$snapshot_name = ‘Oh_snap_’+(Get-Date -Format MMddhhmm)

#Create a new snapshot
try {
‘Trying:’
$getvolume = (Get-HP4Storage -Name $source_storage | Get-HP4cluster -Name $source_cluster | Get-HP4Volume -name $source_vol_name)
‘getvolume-Name: ‘ + $getvolume.Name
‘getvolume-InternalId: ‘ + $getvolume.InternalId
‘getvolume-IsThin: ‘ + $getvolume.IsThinProvision
‘getvolume-Size: ‘ + $getvolume.Size

$getvolume | Add-HP4Snapshot -name $snapshot_name
} catch {
‘Failed to find storage, cluster or datastore’
‘Unable to create snapshot’
break
}

#Remove the oldest snapshot if more than 4 are available
$getsnapshot = ($getvolume | Get-HP4Snapshot | Where-Object {$_.Name -like ‘Oh_snap_*’})
$snapshot_count = @($getsnapshot).Count

if ($snapshot_count -ge 4) {
$getsnapshot | Sort-Object creationtimeutc | Select-Object -First 1 | Remove-HP4Snapshot
}

Populate your Veeam lab with PowerShell

If you, like me, have the need to constantly rebuild a lab environment where the servers are installed already but it lacks any configuration you probably realized that PowerShell is you friend. I have a lab environment that I tear down and build up again really often using templates in my VMware environment. In this environment I have all the infrastructure components installed but not configured in Veeam Backup & Replication so whenever I want to show-and-tell I first need to configure stuff. It might take a while to do, so why not automate with PowerShell?

The script below adds a few managed servers, adds backup proxies, creates a Scale-Out Backup Repository with 2 extents, adds 2 WAN accelerators. On top of that it adds a Tape proxy, connects to a HP VSA and takes a snapshot.

Add-PSSnapin VeeamPSSnapIn -ErrorAction SilentlyContinue

$Infra_Administrator = "Domain1\Administrator"
$Infra_Password = 'Password1'
$Lab_Administrator = "Domain2\Administrator"
$Lab_Password = 'Password2'
$ESXi_root = "root"
$ESXi_Password = 'Password3'
$Oracle_User = "oracle"
$Oracle_Password = 'Password4'
$HPE_User = 'HpeUser'
$HPE_Password = 'Password5'
$VBRserver = Get-VBRServer -Name "VEEAM-VBR.domain1.local"

Add-VBRCredentials -Type Windows -User $Infra_Administrator -Password $Infra_Password -Description $Infra_Administrator
Add-VBRCredentials -Type Windows -User $Lab_Administrator -Password $Lab_Password -Description $Lab_Administrator
Add-VBRCredentials -Type Linux -User $Oracle_User -Password $Oracle_Password -SshPort 23 -ElevateToRoot -AddToSudoers -RootPassword $Oracle_Password -Description "oracle"

#Add servers as ”managed servers”
Add-VBRESXi –Name "VEEAM-ESX" -user root -password 'Password3'
Add-VBRWinServer -Name "VEEAM-HYPERV" -credentials $Infra_Administrator
Add-VBRWinServer -Name "VEEAM-Remote" -credentials $Infra_Administrator
Add-VBRHvHost -Name "VEEAM-HYPERV" -credentials $Infra_Administrator

#Remove/Add proxy with 1 concurrent task limit
Get-VBRViProxy -Name "VMware Backup Proxy" | Remove-VBRViProxy -Confirm
Add-VBRViProxy -Server $VBRserver -Description "VMware Backup Proxy" -MaxTasks 1

#Add Backup Repositories and Scale-Out Backup Repository
Add-VBRBackupRepository -Server $VBRserver -Name "Remote Repository" -Folder "X:\Backups" -Type WinLocal -MaxConcurrentJobs 4 -Credentials $Infra_Administrator
Add-VBRBackupRepository -Name "Local Backup Repository" -Server $VBRserver -Folder "E:\Backups" -Type WinLocal -MountServer $VBRserver -VPowerNFSFolder "C:\ProgramData\Veeam\Backup\NfsDatastore" -MaxConcurrentJobs 4 -Credentials $Infra_Administrator
Set-VBRConfigurationBackupJob -Repository "Remote Repository"
Add-VBRScaleOutBackupRepository -Name "Main Backup Repository" –PolicyType DataLocality –Extent “Default Backup Repository”, “Local Backup Repository”

#Add WAN accelerators
Add-VBRWANAccelerator -Server "VEEAM-Remote" -Description "Remote WAN Accelerator" -CachePath "X:\VeeamWAN" -CacheSize 10 -CacheSizeUnit GB
Get-VBRLocalhost | Add-VBRWANAccelerator -Description "Local WAN Accelerator" -CachePath "X:\VeeamWAN" -CacheSize 10 -CacheSizeUnit GB

#Add a Virtual Lab and Application group
$VLABhost = Get-VBRServer -Type ESXi
$VLABdatastore = Find-VBRViDatastore -Name "datastore1" -Server $VLABhost
Add-VSBVirtualLab -Name "VEEAM-ESX VLAB1" -Server $VLABhost -Datastore $VLABdatastore

Find-VBRViEntity -Name "VEEAM-DC01", "VEEAM-EX01" | Add-VSBViApplicationGroup -Name "Exchange"

#Add SAN and Tape and make a snapshot on the SAN
Add-HP4Storage -DnsOrIpAddress "10.20.30.40" -User $HPE_User -Password $HPE_Password -Description "HPE Storage"
Get-VBRServer -Name "VEEAM-Remote" | Add-VBRTapeServer
Get-HP4Volume -name "datastore1" | Add-HP4Snapshot -name "datastore1_SS_1"

Veeam and PowerShell: A perfect match!

I read a really good and useful blog post a while ago from Preben Berg from Veeam describing how to use PowerShell to restore a database from backup to a dev environment. This made me think on another scenario that would be fun to script that might come in handy someday.

What if you have a SAN that you would want do snapshots on once an hour and save some of those historical snapshots rotating the oldest one.

Now for the disclaimer part, this is merely meant to showcase how you might accomplish this. There are no safety features built in. Do not use it in production and use it at your own risk. However if you’d like to do some further testing of your own, you can download a virtual SAN from HP – free of charge up to 1 TB. Nice!

First things first. We need to create a PowerShell script.

Let’s define which volume to use:
$source_vol_name = "datastore1"

Then we add a naming convention to use for the snapshots with a timestamp at the end:
$snapshot_name = "Oh_snap_"+(Get-Date -Format MMddhhmm)

Let’s count how many snapshots exist on the volume:
$snapshot_count = @(Get-HP4Volume -name $source_vol_name | Get-HP4Snapshot).Count

Now let’s create a snapshot:
$snapshot_create_session = Get-HP4Volume -name $source_vol_name | Add-HP4Snapshot -name $snapshot_name -description "Automated snapshot"

I would like to save the 4 latest snapshots on the volume and delete the oldest:
if ($snapshot_count -ge 4 {
$snapshot_remove_session = Get-HP4Volume -name $source_vol_name | Get-HP4Snapshot | Sort-Object creationtimeutc | Select-Object -First 1 | Remove-HP4Snapshot
}

If I would leave out “Get-HP4Volume -name $source_vol_name”  in the above statement then I would delete to oldest snapshot available on any of the volumes (not just datastore1) which is not our intent.

Let’s put it all together:

Add-PSSnapin VeeamPSSnapIn -ErrorAction SilentlyContinue

$source_vol_name = “datastore1”
$snapshot_name = “Oh_snap_”+(Get-Date -Format MMddhhmm)
$snapshot_count = @(Get-HP4Volume -name $source_vol_name | Get-HP4Snapshot).Count

$snapshot_create_session = Get-HP4Volume -name $source_vol_name | Add-HP4Snapshot -name $snapshot_name -description “Automated snapshot”

if ($snapshot_count -ge 4 {
$snapshot_remove_session = Get-HP4Volume -name $source_vol_name | Get-HP4Snapshot | Sort-Object creationtimeutc | Select-Object -First 1 | Remove-HP4Snapshot
}

That’s all, just a few lines of code and we can accomplish cool things.

Then all we have to do is add the script as a scheduled task on the VBR server and run it once an hour or what ever intervall we’d like.

But let’s see how the infrastructure looks prior to running the script:

1. SAN datastores


Open Task Scheduler and create a new task:

2. Create scheduled task


Let’s configure it to run once an hour starting at 10 PM:

3. Run at 1 hour intervall


We add and action, starting the PowerShell script:

4. Add PowerShell script to run


Looks ok once it’s added:

5. Scheduled task has been added


First time the script ran a snapshot was created as expected:

6. First run of the script


(I changed the script to run every 5 minutes to speed up the process), now we have 4 snapshots:

7. 4 initial snaps


When the fifth snapshot has been taken the oldest snapshot is deleted (the snapshot created at 10:07 PM in the previous picture):

8. 4 snaps rolling


Is Bitlooker from Veeam a game-changer?

Disclaimer: This is not a performance comparison or test in any way, shape or form, it is merely my experience in a lab environment supposed to show an indicative relative difference in performance at a high level. OK, you get the picture?

So as you may know Veeam introduced a new feature in version 9 of Backup & Replication and I thought it would be fun to see if there were any actual benefits of using the feature called “Bitlooker” by doing some basic tests. The goal of my test was to see if there were any differences in running backup jobs with or without backing up dirty blocks (i.e blocks that contains data but has been marked as deleted and thus the blocks can be reused by the operating system) which is the actual functionality of Bitlooker. My starting position was that logically it makes sense of course that it would be more efficient in a lot of ways using Bitlooker but I wanted to see if it was quantifiable: difference in speed and/or backup file size – again at a high level. And as an extended test I also wanted to see if there was any notable difference between using Bitlooker and SDelete (a tool from Sysinternals that you run inside the guest OS to clean up dirty blocks by writing zeros to those blocks).

Description of the Test environment
A Veeam Backup & Replication environment was set up, using simple deployment (all services on a single VM). A virtual machine running Windows Server 2012 was set up as the VM to be backed up running on a vSphere 5.5 host. Anyone familiar with the VMCE lab environment, that’s basically what I was using with and extended drive on on one of the domain controllers. The domain controller was assigned a 200 GB thin disk. I filled the disk with 190 GB worth of data, deleted 160 GB of data and then went ahead with some comparison tests. To describe what actually happens inside the OS at this point, only pointers to blocks containing information is deleted not the actual data on the blocks themselves which means that the OS will know the actual consumption on disk but for an outside observer (vSphere and Veeam for instance) it makes no difference: a block containing data is a block containing data.

Since I’m running the tests on my brand new toy, a Gen 6 Intel NUC which is not an enterprise server, I’m not that interested in the actual performance figures but rather the relative difference between the different test scenarios – all else equal. Oh, but there’s just one thing: Bitlooker only works with Windows and NTFS filesystem.

I initially performed some tests on a 40 GB VM but felt that, even though I saw some great improvements, I couldn’t draw any actual conclusions based on them.

I quickly realized – “We’re gonna need a bigger boat!” and went for the 200 GB drive instead.

Since I already had performed some initial tests on my 40 GB environment the relevant scenarios at this point started at Test 8. All backup jobs were set up to take active full backup of the VM:

Test 8: A 200 GB vmdk where approx 40 GB was consumed. Basic backup test without Bitlooker enabled.
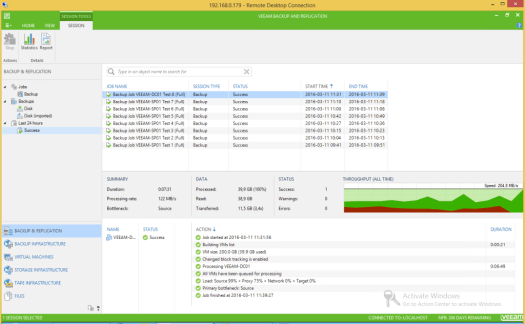
23 - Test 8 - Veeam GUI

24 - Test 8 - filesize

The resulting vbk-files from the 200 GB vmdk containing 40 GB of data is 12 GB in size.

Test 9: A lot of files were added to the VM, roughly 150 GB worth of data. Now the total consumed size of the disk is 191 GB. Again a basic backup test without Bitlooker enabled.

25 - Volume size pre-deletion of files

26 - VMDK size pre-deletion of files

A quick look shows the vmdk to be 200 GB in size.

27 - Test 9 - Veeam GUI

28 - Test 9 - filesize

With compression and deduplication the vbk-file ends up 95 GB in size.

Test 10: Now the fun begins, 163 GB of data was deleted and backup runs without Bitlooker.

29 - Size of files to be deleted

30 - VMDK size post deletion

Even though the files inside the OS has been deleted, the actual vmdk-file size doesn’t change and that’s expected behaviour from a thin disk. And it wouldn’t change even if you made a storage vMotion.

31 - Test 10 - Veeam GUI

32 - Test 10 - file size

This is  where it starts getting interesting, the vbk-file size is still the same size as we saw in the previous test: 95 GB! By logic it should be smaller since we’ve deleted 163 GB of data but clearly from the outside it doesn’t matter – a block is a block is a block.

Test 11: This is where we put Bitlooker to the test, same scenario as Test 10 but Bitlooker has been enabled on the backup job. That’s the only difference, a tick in a box.

33 - Test 11 - Veeam GUI

One big thing to highlight on the picture above is time spent backing up the virtual machine, 6 minutes compared almost 36 minutes in “Test 10”. That’s a huge difference, and the end result will still contain the exact same active data from the VM.

34 - Test 11 - filesize

Massive reduction, we’re now seeing vbk-sizes similar to the first initial backup test in “Test 8”.

Test 12: So let’s see if all types of “zeroing”-techniques are equal. We’re now using SDelete to do it’s job on the C-drive zeroing out all deleted blocks and the backup job runs without Bitlooker.

35 - C drive zapped with SDelete

36 - Test 12 - Veeam GUI

It performs faster than “Test 10” but slower than “Test 11”, that’s interesting! I wasn’t really expecting such a big difference I must admit.

37 - Test 12 - filesize

The backup file size is identical as “Test 10” though, and that was expected.

Test 13: So for fun let’s enable Bitlooker on the job, so SDelete and Bitlooker in conjunction.
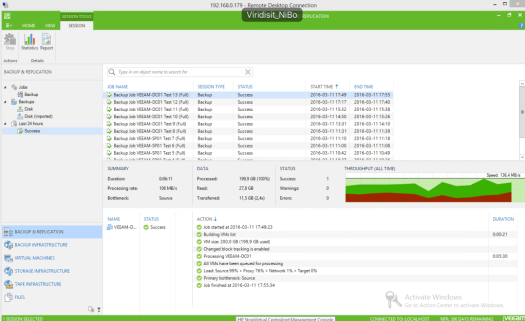
38 - Test 13 - Veeam GUI

Bitsocker comes in to play again reducing the backup time to 6 minutes.

39 - Test 13 - filesize

No change in backup file size, that was expected. So there’s no benefit what so ever in this scenario of using SDelete.

Test 14 – Extra test: Since there was such a difference between “Test 12” and “Test 13” let’s verify the behaviour by disabling Bitlooker and run the job again. This should mean more time spent on the backup, right?

40 - Test 12 verification - Veeam GUI

Yep, we’re back again pushing past 23 minutes for the job.

41 - Test 12 verification - filesize

Backup file size doesn’t change.

Conclusion
Reducing the amount of data to backup from your virtual machines has always been a good thing, how ever historically it has been a manual or at least semi-manual task to accomplish, running SDelete.exe or some eqvivalent tool for instance. Perhaps running as a scheduled task but nonetheless it had to run on the VM itself and would require time and valuable CPU and I/O resoruces in the process. It was also prone to human “error” since someone had to actual run the command or set up a schedule for it – meaning it might be forgotten or missed setting up new VMs. It’s worth mentioning that SDelete is a few years old and that there are other tools available you can use, one of which is a fling from VMware called GuestReclaim but I couldn’t use it in this case since it doesn’t work under Windows Server 2012.

Bitlooker changes the game completely, you literally only have to tick a box on a backupjob to make use of it! Faster backup times and smaller backup files, are there any drawbacks? Well yes and no, if you’re a windows shop go nuts with it but if you’re running any other OS you simply won’t be able to use Bitlooker.

Bitlooker is a great new feature from Veeam, not only does it reduce storage space required to hold your backup files but it also reduces backup time significantly for your active full backups (to be clear it will also make a difference on your incremental backups). As I already mentioned the tests were done on a tiny lab environment but it can still act as an eye-opener in terms of
relative difference with or without bitlooker enabled. Your own milage may vary, but you will see improvements. I tested 1 VM just for fun but I bet you have a lot more VMs, do you think you will save time? I’m sure of it!

“So what about cost? How much do I need to fork out for this great new feature you speak of?” I hear you say. That’s almost the best part: Nothing! You don’t need to pay anything! As long as you have a valid license and support contract you can just upgrade, it’s included in version 9 of Backup & Replication and for all editions: Standard, Enterprise and Enterprise Plus. For all new jobs created it’s even enabled by default and it can easily be enabled on your existing jobs – just tick the box. Thank you Veeam!

I would recommend enabling this feature on all your backups if you haven’t done so already. Period.

So ending with answering my question in the subject: Yes! It really is.